
Feeling the desire to provide your chickens with a safe and comfortable environment to roam freely? Look no further! This comprehensive tutorial will guide you through the process of creating a bespoke poultry enclosure from scratch, ensuring that your winged companions receive the care they deserve.
Discover the Joy of Crafting Your Own Chicken Run
With the help of this step-by-step tutorial, you can embrace the joy of designing and constructing a chicken run tailored to suit your specific needs. By hatching your ideas and bringing them to life, you’ll witness firsthand the satisfaction of creating an enclosure that harmoniously blends aesthetics and functionality.
Enhancing The Well-being of Your Feathered Flock
Your chickens deserve a space that caters to their physical and mental well-being. By following this poultry enclosure tutorial, not only will you be able to provide your chickens with a secure and robust habitat, but you’ll also create an environment that promotes their natural behaviors, fostering contentment and overall health.
Unleash Your Creativity with DIY Poultry Enclosure Construction
Ready to embark on an exciting venture where you can explore your inner creativity? This DIY tutorial will enable you to unleash your imagination and experiment with various materials and designs, ensuring that your chicken run becomes a unique testament to your resourcefulness and innovation.
- Planning and Preparation
- Determine the Size and Location
- Gather the Necessary Materials
- Create a Detailed Blueprint
- Building the Chicken Run
- Clear the Area and Prepare the Ground
- Construct the Frame and Secure It
- Add Protective Barriers and Netting
- Installing Essential Features
- Include a Secure Entry Gate
- Questions and answers
Planning and Preparation

Before embarking on the journey of building your own poultry enclosure, it is vital to engage in thorough planning and preparation. This crucial step will ensure that you have a clear vision of your chicken run and will help you avoid any potential challenges along the way.
In this phase, take the time to carefully assess your available space, considering factors such as size, location, and accessibility. Identify any existing structures or obstacles that may impact the design or layout of your chicken run. Additionally, take into account the number of chickens you plan to house and consider their specific breed requirements.
Next, create a detailed blueprint or sketch that outlines the overall structure, including dimensions, materials, and required resources. This will serve as a visual guide throughout the building process and will help you determine the quantities and types of materials needed.
When it comes to materials, prioritize durability, safety, and ease of maintenance. Research various options and select those that align with your budget and preferences. Consider using materials like weather-resistant wood, strong wire mesh, and sturdy hardware for optimal longevity and security.
Another crucial aspect of the planning phase is determining the layout and design of your chicken run. Consider factors such as the placement of feeding and watering stations, nesting boxes, and roosts. Aim for a design that allows easy access for cleaning and maintenance, as well as ample space for your chickens to roam and exercise.
Lastly, it is essential to investigate any local regulations or permits required for keeping chickens in your area. Familiarize yourself with any zoning restrictions and take necessary steps to ensure compliance. Additionally, consider joining online forums or seeking advice from experienced poultry keepers to gain insights and avoid common pitfalls.
By dedicating time and effort to thorough planning and preparation, you will set yourself up for success in building your own chicken run. This stage is crucial for creating a safe, functional, and enjoyable space for your feathered friends to thrive.
Determine the Size and Location
Before embarking on the exciting journey of building your very own chicken run, it is essential to carefully consider the size and location of this poultry enclosure. This crucial first step will dictate the comfort and well-being of your chickens, ensuring they have ample space to roam and thrive. Furthermore, selecting the right spot for the chicken run is pivotal in terms of accessibility, safety, and convenience.
Size: When determining the size of your chicken run, it is important to factor in the number of chickens you plan to keep. Each chicken should ideally have a minimum of 10 square feet of space. However, providing more space will not only enhance their quality of life but also reduce stress and potential health issues. Take into consideration the breed of your chickens as well, as some may require additional room to roam.
Location: Choosing the ideal location for your chicken run involves several considerations. Firstly, it is essential to select an area that receives adequate sunlight. Sunlight helps promote the growth of grass and other vegetation within the chicken run, providing your chickens with natural foraging opportunities. Additionally, ensure the location is easily accessible for you to collect eggs, clean the coop, and provide food and water. Lastly, consider the safety and security of the chicken run by selecting a spot with minimal exposure to predators and other potential threats.
By carefully determining the size and location of your chicken run, you are setting a solid foundation for the successful establishment of a safe and comfortable environment for your feathered friends. Remember, while this step may require some thoughtful planning and decision-making, the effort will be well worth it in the long run, as your chickens will enjoy a happy and healthy existence within their new home.
Gather the Necessary Materials
In order to start building your chicken run, you’ll need to gather all the essential materials. These items are vital for creating a secure and comfortable enclosure for your poultry. Here is a list of the key materials you will need:
- Wire mesh or chicken wire: This will be used to create the walls and roof of the chicken run, providing a barrier to keep your chickens safe.
- Wooden posts or stakes: These will serve as the framework for the chicken run, ensuring stability and support.
- Wire cutters: You will need these to cut and shape the wire mesh according to your desired dimensions.
- Nails or screws: These will be used to secure the wire mesh to the wooden posts, ensuring a sturdy construction.
- Gate latch or lock: To provide easy access to the chicken run, you’ll need a gate latch or lock to keep it securely closed.
- Chicken feeders and waterers: Make sure to have an adequate number of feeders and waterers to keep your chickens well-fed and hydrated.
- Shade cloth or tarp: If your chicken run is exposed to direct sunlight, it’s important to provide shade for your chickens. A shade cloth or tarp can be used to create a shaded area.
- Straw or wood shavings: These materials will be used as bedding in the chicken run, providing a comfortable and clean environment for your chickens.
Once you have gathered all these necessary materials, you’ll be well-prepared to start building your own chicken run and create a safe space for your feathered friends.
Create a Detailed Blueprint
One crucial step in building a chicken run is creating a detailed blueprint. A blueprint serves as a visual representation of your project, allowing you to plan and organize every aspect of the poultry enclosure. By laying out your ideas and design in a blueprint, you can ensure that you have a clear understanding of the materials, measurements, and layout required for your DIY project.
To begin, gather all the necessary information and measurements that will be relevant to your chicken run. Consider factors such as the size of the area you have available, the number of chickens you plan to house, and any specific requirements or features you desire, like nesting boxes or perches. Take care to note any existing structures, trees, or obstructions that may affect the design and placement of your poultry enclosure.
Once you have a clear understanding of your project requirements, it’s time to translate this information into a visual representation. A simple and effective way to create a blueprint is by using a table. In the table, you can specify each component of the chicken run, such as the dimensions of the main coop structure, the size and location of the fenced area, and any additional features you plan to incorporate.
| Component | Dimensions/Specifications |
|---|---|
| Main Coop Structure | 10ft x 6ft x 7ft |
| Fenced Area | 20ft x 30ft |
| Nesting Boxes | 2 boxes, 12in x 12in x 12in |
| Perches | 2 perches, 4ft long |
As you create the blueprint, remember to add any necessary notes or specifications that will aid in the construction process. These may include details about the materials to be used, the methods of assembly, or any recommended modifications based on your specific circumstances.
By taking the time to create a detailed blueprint, you can save yourself time, money, and frustration during the construction of your chicken run. Having a clear plan in place will ensure that you have all the necessary materials and measurements, allowing for a smoother and more efficient DIY project.
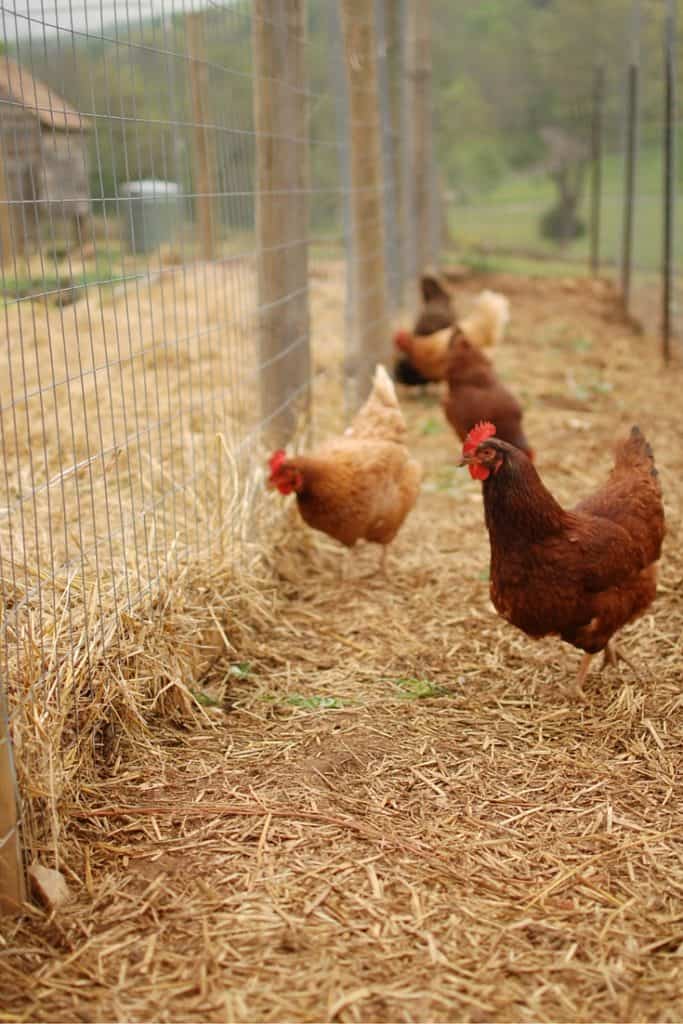
Building the Chicken Run
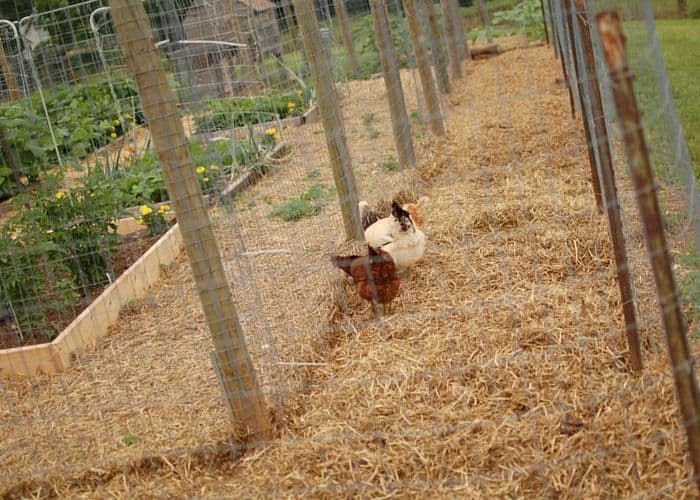
In this section, we will take a closer look at the construction process involved in creating a safe and secure enclosure for your poultry. This step-by-step tutorial will guide you through the necessary materials and techniques to build a custom chicken run that meets your specific needs and preferences. By following these instructions, you will not only ensure the safety of your chickens but also create a functional and attractive space for them to roam.
To begin, it is essential to gather all the materials needed for the construction of the chicken run. This includes items such as fencing, posts, hinges, latches, and wire mesh. These materials will form the foundation of the enclosure and provide the necessary protection against predators and escape attempts. It is important to choose materials that are durable and suitable for outdoor use to ensure the longevity of the chicken run.
Once you have gathered all the necessary materials, it’s time to plan the layout of the chicken run. Consider factors such as the available space, the number of chickens you have, and any specific requirements they may have. This will help you determine the size and shape of the enclosure, as well as the placement of additional features such as shelter, perches, and feeding stations.
The next step in the construction process is to prepare the ground where the chicken run will be located. Clear out any debris or vegetation and level the area as much as possible. This will provide a stable base for the enclosure and help prevent digging attempts from predators. Additionally, consider installing a barrier below ground level to prevent burrowers from entering the chicken run.
With the groundwork complete, it is time to begin assembling the chicken run. Start by installing the posts at regular intervals along the perimeter of the enclosure. These posts will provide stability and support for the fencing and wire mesh. Make sure to secure them firmly in place to withstand any potential external forces or chicken activity.
Once the posts are in place, attach the fencing and wire mesh. This will create the walls of the chicken run, ensuring that your poultry remains safe and contained. Use appropriate tools to fix the fencing and wire mesh securely to the posts, making sure there are no gaps or loose areas that can compromise the integrity of the enclosure.
Lastly, add any additional features that will enhance the functionality and comfort of the chicken run. This can include the installation of a covered shelter for protection against the elements, perches for chickens to roost and rest, and feeding stations for easy access to food and water. These features will not only provide a safe environment for your chickens but also promote their overall well-being.
With the completion of these steps, you have successfully built your own chicken run. It is important to regularly inspect and maintain the enclosure to ensure its continued integrity and the safety of your chickens. By following this DIY poultry enclosure tutorial, you have provided your poultry with a secure and functional space to thrive in.
Clear the Area and Prepare the Ground
Before constructing your own poultry enclosure, it is essential to clear the designated area and properly prepare the ground. This initial step sets the foundation for building a safe and functional space for your chickens to roam and explore.
Firstly, remove any existing debris, such as rocks, branches, or other objects that may obstruct the development of the chicken run. Clearing the area ensures a clean and safe environment for your feathered friends.
Next, assess the ground and its current condition. Is the soil uneven or sloping? If so, consider leveling it out by adding or removing soil, making sure to provide a flat surface for the enclosure. A level ground guarantees stability and prevents water from pooling or draining away too quickly.
Once you have cleared the area and leveled the ground, it is crucial to address any potential drainage issues. Ensure that the chicken run is adequately situated to prevent water pooling, as this can lead to muddy conditions, discomfort for the chickens, and even health issues. Creating a slight slope away from the enclosure can promote proper drainage and prevent water accumulation.
Add a layer of gravel or sand to the ground to improve drainage further and serve as a base for the chicken run. This added layer prevents excessive moisture retention and provides a solid foundation for the enclosure.
Finally, consider adding a natural barrier to the perimeter of the chicken run. This can be achieved by planting shrubs, erecting a fence, or constructing a low stone wall, effectively marking the boundaries of the enclosure and providing an additional layer of security for your chickens.
By clearing the area and properly preparing the ground, you create an optimal setting for building your own chicken run. This ensures a safe, comfortable, and sustainable space for your poultry to thrive and enjoy their new home.
Construct the Frame and Secure It
In this section, we will walk you through the process of building the frame for your poultry enclosure and ensuring its stability. Creating a strong and secure frame is essential to keep your chickens safe and protected while allowing them to roam freely.
Firstly, gather all the necessary materials such as sturdy wooden beams, screws, and a power drill. Measure the dimensions of the desired chicken run and cut the wooden beams accordingly. Remember, the frame should be tall enough for the chickens to comfortably walk around without feeling confined.
Next, assemble the frame by attaching the wooden beams together using screws. Ensure that all corners are square and joints are tightly secured. It is recommended to reinforce the frame by adding additional support beams in the center and at regular intervals along the length of the enclosure.
Once the frame is constructed, place it in the desired location where you want the chicken run to be. Use a level to ensure that it is perfectly balanced and adjust if necessary. You can secure the frame to the ground by attaching it to posts or using stakes, depending on your preference and the stability of the ground.
To further reinforce the frame, consider adding cross braces diagonally from corner to corner. This will provide additional strength and prevent the frame from wobbling. Use screws or metal brackets to secure the braces firmly in place.
Lastly, give the frame a thorough inspection to make sure it is stable and durable. Shake it to check for any weak spots or loose joints. Make any necessary adjustments to ensure the frame is sturdy and safe for your chickens.
Remember, constructing a solid frame is the foundation of a high-quality chicken run. Taking the time to build it correctly will ensure the safety and well-being of your poultry, creating a comfortable and secure environment for them to thrive.
Add Protective Barriers and Netting
Enhance the security of your poultry enclosure with the addition of protective barriers and netting. By implementing these measures, you can safeguard your chickens and prevent potential threats from gaining access to the enclosure.
- Install a sturdy perimeter fence
- Ensure the fence is at least 6 feet high to deter predators
- Choose materials such as welded wire or chain link for added strength
- Regularly inspect the fence for any signs of damage or breaches
- Secure the bottom of the fence to prevent animals from burrowing underneath
- Consider adding an electric fence as an additional deterrent
- Attach netting to the top of the enclosure to prevent avian predators from swooping in
- Use mesh with a small aperture size to prevent smaller predators from squeezing through
- Regularly check the netting for any tears or gaps and repair them promptly
- Inspect the surrounding area for overhanging branches or obstacles that could be used to access the enclosure
By incorporating protective barriers and netting into your chicken run, you can create a safe and secure environment for your feathered friends, minimizing the risk of predation and ensuring their well-being.
Installing Essential Features
Setting up the necessary elements for your poultry enclosure is an important step in creating a safe and functional chicken run. In this section, we will explore the essential features that need to be installed to ensure the well-being of your chickens.
- Fencing: Start by installing a secure fence around the perimeter of the chicken run to keep predators out and your chickens safely contained. Choose a sturdy fence material, such as wire mesh or hardware cloth, and ensure it is buried at least a foot into the ground to prevent digging predators from gaining access.
- Gate: Install a gate in the fence for easy access to the chicken run. Make sure the gate is securely attached and easy to open and close. You may consider using a latch or lock mechanism to prevent any accidental escapes.
- Roof: To protect your chickens from predators and the elements, install a roof over the chicken run. This can be done using a variety of materials, such as corrugated metal or polycarbonate panels. Ensure that the roof is securely fastened and provides adequate ventilation to maintain a comfortable environment for your chickens.
- Nesting Boxes: Create a cozy nesting area for your chickens by installing nesting boxes. These boxes provide a secluded space for your hens to lay their eggs. Place them at a comfortable height and ensure they are filled with clean bedding material for your chickens’ comfort.
- Perches: Install perches at various heights within the chicken run to allow your chickens to roost and rest. Choose sturdy materials that can support the weight of your chickens and provide enough space for each bird to comfortably perch.
- Feeder and Waterer: Set up a feeder and waterer within the chicken run to ensure your chickens have access to food and water at all times. Place them in an easily accessible location, away from potential contaminants and predators.
By installing these essential features, you will create a safe and functional environment for your chickens to thrive in. Take the time to carefully set up each element, ensuring they are securely installed and easily accessible for both you and your feathered friends.
Include a Secure Entry Gate
When constructing your chicken run, it is essential to include a secure entry gate to keep your poultry safe and protected. The entry gate serves as the primary access point to the enclosure, allowing you to easily enter and exit while ensuring that your chickens remain confined within the designated area.
1. Choose a Sturdy and Durable Gate
Selecting a gate made from sturdy materials, such as metal or reinforced wood, is crucial to ensure its durability and longevity. Opt for a gate that can withstand various weather conditions, including wind, rain, and snow. Additionally, consider the overall design of the gate, ensuring that it complements the aesthetics of your chicken run.
2. Install a Locking Mechanism
To enhance security, install a reliable locking mechanism on your entry gate. Choose a lock that cannot be easily manipulated or tampered with, ensuring that your chickens cannot escape or predators cannot gain entry. It is also recommended to install a self-closing mechanism to prevent accidental gate left open situations.
3. Incorporate Predator-Proofing Measures
Along with a strong gate, it is vital to incorporate predator-proofing measures into the design. Attach mesh or wire fencing along the lower portion of the gate and ensure that it is buried at least a foot below the ground. This prevents predators from digging underneath and gaining access to your chickens. Additionally, consider adding a top cover or roof to further deter potential threats from above.
4. Easy Access for Daily Maintenance
When designing your entry gate, consider including a small door or hatch to allow for easy access when conducting daily maintenance tasks, such as feeding, watering, and cleaning. This access point allows you to interact with your chickens without having to fully open the entire gate, reducing the risk of escape or intrusion.
By including a secure entry gate in your chicken run, you provide a vital layer of protection for your poultry. With the right materials, locking mechanisms, predator-proofing measures, and easy access points, you can ensure the safety and security of your flock while maintaining convenience for yourself.
Questions and answers
Why do I need a chicken run?
A chicken run is a safe and enclosed space for your chickens to roam freely while still being protected from predators. It allows them to exercise, forage for food, and enjoy fresh air and sunlight.
What materials do I need to build a chicken run?
You will need wire fencing, wooden posts, hinges, screws, a gate latch, a staple gun, wire cutters, a shovel, and concrete mix.
How big should the chicken run be?
The size of the chicken run will depend on the number of chickens you have. As a general rule, each chicken should have at least 10 square feet of space. So if you have 5 chickens, your chicken run should be at least 50 square feet.
How do I secure the chicken run from predators?
You can secure the chicken run by burying the wire fencing at least 12 inches deep into the ground to prevent burrowing predators from digging under it. Additionally, make sure the fencing is tall enough and has no gaps for predators to squeeze through.
Can I customize the chicken run design?
Yes, you can definitely customize the design of your chicken run to suit your needs and preferences. You can add a roof for extra protection, create multiple access points, or even incorporate additional nesting boxes or perches.
What materials do I need to build a chicken run?
To build a chicken run, you will need materials such as wooden posts, wire mesh, nails, hinges, screws, a gate, and roofing materials.
How much space do chickens need in a run?
Chickens need a minimum of 10 square feet per bird in a run. However, it is recommended to provide more space if possible to ensure their comfort and well-being.
Can I build a chicken run without any previous construction experience?
Yes, you can build a chicken run even if you have no previous construction experience. This DIY tutorial provides step-by-step instructions that are easy to follow, making it accessible for beginners.
What are some predator-proofing measures I should consider when building a chicken run?
When building a chicken run, it is important to consider predator-proofing measures such as burying wire mesh along the perimeter to prevent digging, securing the roof to prevent access from above, and using sturdy materials that cannot be easily broken into by predators.
How long does it typically take to build a chicken run using this tutorial?
The time it takes to build a chicken run using this tutorial will vary depending on your level of experience and the size of the enclosure. However, it is estimated to take an average of one to two days to complete the project.


