Embarking on an outdoor excursion can be an invigorating escape from the hustle and bustle of everyday life. Whether you’re an avid adventurer or a weekend warrior, camping provides the perfect opportunity to reconnect with nature and unwind. However, navigating the great outdoors can sometimes present challenges that may seem daunting to even the most seasoned camper.
Fortunately, with a little ingenuity and resourcefulness, you can transform your camping trip into a seamless and enjoyable experience. From clever tricks to maximize space in your camping gear to innovative ways to light up your campsite, these 10 genius camping hacks will revolutionize the way you explore the wilderness.
Revolutionize Your Health & Lifestyle!
Dive into the world of Ketogenic Diet. Learn how to lose weight effectively while enjoying your meals. It's not just a diet; it's a lifestyle change.
Learn MoreFirst off, let’s delve into the art of packing efficiently. Imagine a world where you can fit all your essentials into a compact backpack without compromising on comfort or convenience. This is where the power of organizing and utilizing versatile gear comes into play. By employing a few strategic packing techniques and investing in multi-purpose tools, you can streamline your camping gear and eliminate unnecessary clutter.
- Genius Camping Tips for an Effortless Exploration of the Great Outdoors
- Multi-purpose Tarp Hacks
- Create a Waterproof Shelter
- Use as a Groundsheet
- Make a Hammock Rainfly
- Campfire Cooking Tips and Tricks
- DIY Campfire Grill
- Cooking with Foil Packets
- Turn a Tin Can into a Stove
- Clever Packing Tips
- Roll Your Clothes for More Space
- Questions and answers
Genius Camping Tips for an Effortless Exploration of the Great Outdoors

Embarking on an outdoor adventure in nature can be an amazing experience, but it can also present its fair share of challenges. These ingenious camping tips offer practical solutions to simplify and enhance your time spent in the wilderness, allowing you to fully appreciate the tranquility and beauty of your surroundings.
1. Clever Campfire Cooking: Elevate your culinary skills by mastering the art of campfire cooking. Instead of relying solely on traditional camping meals, experiment with grilling fresh vegetables, making foil-wrapped meals, and using cast-iron pans to create delicious and nutritious outdoor feasts.
2. Resourceful Water Storage: Ensure you have a steady supply of fresh water by utilizing innovative water storage solutions. Invest in collapsible water containers or repurpose empty plastic bottles to optimize your water-carrying capabilities without taking up unnecessary space.
3. Smart Packing Strategies: Streamline your packing process by implementing smart strategies that maximize space and minimize clutter. Roll your clothes instead of folding them, pack multi-purpose items, and use compression bags to save valuable space in your backpack.
4. Efficient Lighting Solutions: Embrace the darkness of the night and illuminate your campsite efficiently. Utilize headlamps, solar-powered lights, and LED lanterns to enhance visibility and create a cozy and inviting atmosphere while still being mindful of the environment.
5. Instant Fire Starters: Make fire starting hassle-free by using readily available household items. Cotton balls soaked in petroleum jelly or dryer lint stuffed into cardboard egg cartons make excellent, compact fire starters that ignite quickly and burn for an extended period.
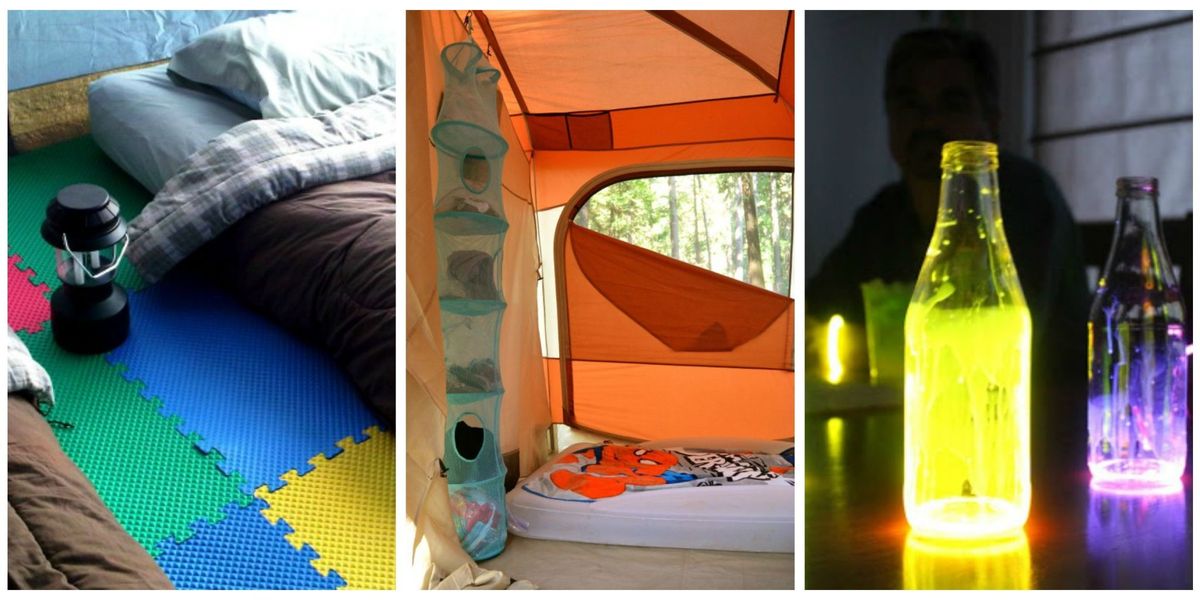
6. Nature-friendly Toilet Alternatives: Preserve the integrity of nature by utilizing eco-friendly toilet alternatives. Biodegradable wet wipes, portable camping toilets, or even digging a proper cat hole are all environmentally conscious options that ensure responsible waste management.
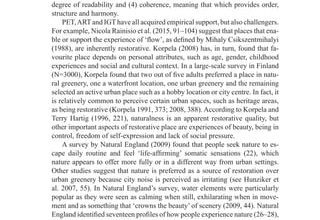
7. Practical Packing Mat: Keep your camping gear clean and free from dirt by using a durable and waterproof packing mat. This simple yet effective solution provides a clean and organized area to store and pack your gear, while also preventing moisture and dirt from being carried into your tent.
8. Insect Repellent Solutions: Banish bothersome bugs and insects with natural repellents that won’t harm the ecosystem. Citronella candles, essential oils, and insect-repellent wristbands offer effective protection while allowing you to fully immerse yourself in nature without the annoyance of buzzing pests.
9. Creative Campsite Entertainment: Keep yourself thoroughly entertained during downtime at the campsite with creative and engaging activities. Play classic camping games, bring along a deck of cards, or try stargazing and identifying different constellations for a truly immersive outdoor experience.
10. Mindful Waste Disposal: Ensure you leave no trace of your presence by practicing responsible waste disposal. Separate your recyclables, properly dispose of food waste to minimize animal attraction, and always leave your campsite cleaner than you found it to preserve the natural beauty for future campers.
By incorporating these genius camping tips into your outdoor adventure, you can simplify your camping experience while fully embracing the wonders that nature has to offer. Remember to always respect the environment and leave only footprints behind!
Multi-purpose Tarp Hacks
Discover the versatility of tarps with these innovative ideas that can enhance your camping experience in unexpected ways. Tarps are more than just a simple shelter; they can be transformed into indispensable tools for various purposes, making your outdoor adventure even more enjoyable and convenient.
1. Tarp as a Groundsheet: Secure a tarp to the ground using tent stakes or heavy objects to create a clean and dry surface for sleeping or storing your belongings. This not only protects you from dampness and insects but also provides an additional layer of insulation.
2. Tarp for Rainwater Collection: Use a tarp with proper slope and positioning to collect rainwater, providing you with a valuable source of clean water for cooking, drinking, or washing. Remember to filter or purify the collected water before use.
3. Tarp as a Sun Shade: Hang a tarp between trees or use poles to create a shaded area in your campsite. This provides protection from the scorching sun, allowing you to relax and unwind comfortably, especially during hot summer days.
4. Tarp as a Windbreak: Set up a tarp along the windy side of your campsite to block strong gusts and create a more pleasant and sheltered environment. This hack not only helps to keep your fire alive but also provides a cozy space for cooking and socializing.
5. Tarp as a Privacy Wall: Utilize a tarp to create a private area for changing clothes, taking showers, or using portable toilet facilities. This enables you to maintain your privacy in crowded campsites or areas lacking designated facilities.
6. Tarp for Gear Protection: Cover your equipment, bikes, or firewood stack with a tarp to shield them from rain, dew, or dirt. This simple yet effective hack keeps your supplies dry and in good condition, ensuring they are ready for use whenever needed.
7. Tarp as an Emergency Shelter: In unforeseen situations, a tarp can serve as a temporary emergency shelter. With some creative folding and securing techniques, you can shield yourself from rain, wind, or excessive sun exposure until proper shelter is available.
8. Tarp for Outdoor Cooking: Set up a tarp above your cooking area to protect it from rain, allowing you to cook and prepare food comfortably even in inclement weather. This hack ensures you can still enjoy delicious meals while being shielded from the elements.
9. Tarp as a Picnic Mat: Lay a tarp on the ground to create a clean and dry surface for picnics or outdoor activities. This prevents your food, drinks, or personal items from getting dirty or wet due to damp grass or soil.
10. Tarp for Creating a Hammock Shelter: With some ropes, trees, and a tarp, you can fashion a makeshift hammock shelter. This unique hack allows you to relax and sleep comfortably while being protected from rain, insects, and other outdoor nuisances.
These multi-purpose tarp hacks demonstrate the ingenuity and adaptability of such a simple camping essential. With a little creativity, you can make the most out of your tarps and elevate your camping experience to new heights.
Create a Waterproof Shelter
When spending time in the great outdoors, it’s crucial to have a reliable shelter that protects you from the elements. Whether you’re camping in the mountains, hiking along a river, or simply enjoying a day at the beach, having a waterproof shelter can make all the difference in keeping you dry and comfortable.
There are several creative ways to create a waterproof shelter using items you may already have on hand or can easily find in nature. One option is to use a tarp or a large plastic sheet as a base for your shelter. By securing the corners with stakes or tying them to nearby trees, you can create a protective covering overhead.
If you want to go the extra mile and ensure a completely watertight shelter, consider using a silicone-based sealant on the seams of your tarp or plastic sheet. This will help to prevent any water from seeping through and keep you dry even during heavy rain showers.
Another option for creating a waterproof shelter is to utilize natural materials such as leaves, branches, and bark. By constructing a sturdy framework using branches and securing it with vines or rope, you can create a natural shelter that provides effective protection against rain and other elements.
- Collect large leaves or pieces of bark and layer them on top of your framework to create a waterproof roof.
- Ensure that the leaves or bark overlap well to prevent any water from seeping through.
- You can also use smaller branches or twigs to weave a protective wall around your shelter, adding an extra layer of insulation.
When setting up your shelter, it’s important to consider the direction of the wind and any potential water runoff. Placing your shelter on higher ground and facing it away from the prevailing wind will help to minimize the chances of rain blowing into your shelter.
Additionally, consider using a groundsheet or a thick layer of leaves underneath your sleeping area to provide further protection from the damp ground. This will help to keep you warm and dry throughout the night.
Remember, the key to creating a waterproof shelter is to be resourceful and adaptable. Use what nature provides you with and think creatively to ensure that your shelter is not only watertight but also comfortable and functional. With a little preparation and ingenuity, you can enjoy your outdoor adventure without worrying about getting wet.
Use as a Groundsheet
Enhance the functionality of your camping equipment by repurposing an everyday item as a groundsheet. Instead of investing in expensive specialized ground coverings, you can opt for a cost-effective alternative that provides the same protection.
When setting up your campsite, consider using a tarp, plastic sheet, or even a large piece of waterproof fabric as a groundsheet. These versatile materials can be easily folded and stored, taking up minimal space in your camping gear. By placing them underneath your tent or sleeping area, you can create a barrier against moisture, dirt, and insects that may otherwise seep through the ground.
Make sure to secure the edges of your makeshift groundsheet with rocks or pegs to prevent it from shifting or blowing away in windy conditions. Additionally, it is beneficial to choose a sturdy and durable material that can withstand the wear and tear of outdoor use.
Using a groundsheet not only protects your equipment from potential damage but also provides a clean and dry surface to walk on. This is particularly advantageous when camping in wet or muddy areas, as it helps to maintain hygiene and keep your camping experience comfortable.
By utilizing an improvised groundsheet, you can save money, reduce the weight and bulk of your camping gear, and simplify the setup process. This practical camping hack allows you to enjoy the outdoors without compromising on convenience and comfort.
Make a Hammock Rainfly
In this section, we will explore a clever method to create a protective covering for your hammock that will shield you from rain and other adverse weather conditions. By following these simple steps, you can ensure a comfortable and dry outdoor experience.
| Materials Needed: | Instructions: |
|---|---|
| Tarp or waterproof fabric | 1. Begin by selecting a suitable waterproof material such as a tarp or specialized hammock rainfly fabric. |
| Guylines or ropes | 2. Cut the fabric to size, allowing enough extra material to provide adequate coverage for your hammock. |
| Tent stakes or tree straps | 3. Attach guylines or ropes to the corners or edges of the fabric to create attachment points. |
| Hammock | 4. Find sturdy anchor points such as trees or poles to suspend your hammock rainfly above your hammock. |
| Poles or trekking poles (optional) | 5. Adjust the height and tension of the rainfly by using additional poles or trekking poles as support if needed. |
| Hammock suspension straps or ropes | 6. Finally, secure the rainfly tightly using guylines, ropes, or hammock suspension straps to ensure it stays in place during windy conditions. |
By following these steps, you can create a reliable and effective rainfly for your hammock, providing you with protection from rain, wind, and other elements. This simple DIY solution will enhance your camping experience and allow you to enjoy the great outdoors even during unfavorable weather conditions.
Campfire Cooking Tips and Tricks
Enhance your outdoor culinary skills with these innovative campfire cooking hacks. Discover clever techniques and ideas to make your campfire meals spectacular without the need for fancy equipment or complicated recipes. Whether you’re an experienced outdoor chef or a beginner, these tips will help you elevate your campfire cooking game and create delicious meals that will leave you and your fellow adventurers satisfied.
- Elevate Your Grill Game: Instead of using a traditional grate, try using a makeshift grill by placing sturdy branches or rocks on either side of your campfire. Lay a wire cooling rack or a wire mesh screen on top, and you’ve got yourself a simple and effective grilling surface.
- Master the Dutch Oven: The Dutch oven is a versatile cooking tool for campfire cooking. Use it to bake bread, cook stews, roast meats, and even make delectable desserts. Its thick walls and tight-fitting lid retain heat effectively, allowing for even cooking and amazing flavors.
- Prep Ahead of Time: Save time and effort by prepping some of your ingredients before heading out to your campsite. Chop vegetables, marinate meats, and pre-mix dry ingredients to make meal preparation at the campfire a breeze.
- Stock Up on Foil: Aluminum foil is a camping kitchen essential. Use it to wrap individual servings of food for easy cooking and cleanup. Create DIY foil packets filled with seasoned meats, vegetables, and even desserts. Simply place them on the coals or grill and let the magic happen.
- Upgrade Your Skewers: Skip the flimsy wooden skewers and opt for stainless steel skewers instead. They are reusable and won’t burn or splinter under the heat of the fire. Thread different ingredients onto each skewer to create tasty kebabs and enjoy a hassle-free cooking experience.
- Utilize Natural Tools: Take advantage of nature’s tools by using large leaves, such as banana or cabbage leaves, to wrap and cook food. Not only will this infuse your dishes with unique flavors, but it also eliminates the need for extra mess and cleanup.
- Make Use of Hot Stones: Heat a selection of stones by placing them near the fire. Once they are hot, carefully transfer them into a pot of water to boil, providing an alternative way to cook or heat up dishes. This ancient technique ensures steady heat distribution and adds an extra element of adventure to your camping meals.
- Get Creative with Spice Kits: Instead of bringing along multiple spice jars, create personalized spice kits by storing various spices in small, labeled containers or plastic bags. This way, you can easily add flavor and enhance your meals without the hassle of carrying bulky jars.
- Try Campfire Popcorn: Popcorn is a delicious and simple snack that can easily be made over a campfire. Simply place popcorn kernels in a foil packet, add butter and seasoning, then hold it over the flames until the popping slows down. The result: fresh and flavorful popcorn that everyone will love.
- Experiment with Foil-Wrapped Desserts: Indulge your sweet tooth by making mouthwatering desserts in foil packets. Fill them with sliced fruits, chocolate chips, marshmallows, and a drizzle of honey or caramel. Place the packets onto hot coals and let the ingredients meld together into a gooey, delicious treat.
With these campfire cooking hacks, you’ll not only simplify your camping culinary experience but also impress your fellow adventurers with your creativity and delicious food. So, gather your ingredients, grab your cooking tools, and get ready to take your campfire cooking to the next level!
DIY Campfire Grill
If you enjoy cooking over an open fire while camping, creating your own campfire grill can enhance your outdoor cooking experience. With a few simple materials and some creativity, you can easily make a DIY campfire grill that will allow you to cook delicious meals over the flames.
One option for making a campfire grill is to use a sturdy metal grate or wire mesh that can be placed over the fire. This will provide a stable surface for cooking your food and prevent it from falling into the flames. You can adjust the height of the grill by using rocks or logs as support, depending on the intensity of the fire and the desired cooking temperature.
Another creative way to make a campfire grill is to use an old metal gate or fence panel. By securing the panel between two sturdy logs or rocks, you can create a stable and spacious cooking surface. This method allows for easy adjustment of the height and can accommodate larger amounts of food.
If you prefer a more compact and portable option, consider making a DIY grill basket. This can be made by attaching a wire mesh to a metal frame, such as an old picture frame, using strong wire or metal fasteners. The grill basket can then be placed directly on the fire and used to cook smaller foods like vegetables or fish.
| Pros | Cons |
|---|---|
| Easy to make with simple materials | May require some trial and error to find the perfect cooking height |
| Provides a stable cooking surface | May not be suitable for large quantities of food |
| Allows for easy adjustment of cooking temperature | Requires careful monitoring to avoid burning or overcooking |
| Can be compact and portable | May require additional cleaning and maintenance |
No matter which method you choose, remember to always use caution when cooking over an open flame and follow proper fire safety guidelines. A DIY campfire grill can add a touch of creativity and convenience to your outdoor cooking adventures, making your camping experience even more enjoyable.
Cooking with Foil Packets
In this section, we will explore the art of preparing delicious meals using a cooking technique known as foil packets. By utilizing the versatility and convenience of cooking with foil, you can enhance your outdoor dining experience and savor mouthwatering dishes without the need for elaborate equipment or complicated recipes.
Foil packets offer a practical and efficient method for cooking a variety of meals while camping or enjoying any outdoor activity. They can be easily customized to accommodate different ingredients and dietary preferences, making them suitable for all types of outdoor enthusiasts. Whether you are a seasoned camping expert or embarking on your first wilderness adventure, cooking with foil packets is a clever way to simplify meal preparation and minimize clean-up.
The beauty of foil packets lies in their simplicity. All you need is a sheet of sturdy aluminum foil, and you can create a sealed cooking pouch that locks in flavors and juices, while also preserving the nutrients of your ingredients. Whether you prefer to grill, bake, or steam, the foil packet method allows for even heat distribution, ensuring that your meals are cooked to perfection. Plus, the individual servings make it easy to cater to everyone’s preferences and dietary needs.
The options for foil packet cooking are endless. From hearty breakfasts to satisfying lunches and mouthwatering dinners, there is a foil packet recipe that will tantalize your taste buds. You can create foil packet meals with a variety of protein sources such as chicken, fish, or shrimp, paired with an assortment of vegetables, herbs, and spices. The combinations are limited only by your imagination, allowing you to experiment and discover new flavors while enjoying the great outdoors.
In addition to their versatility, foil packets offer a practical solution for clean-up. With no pots or pans to scrub, you can simply dispose of the used foil after enjoying your delicious meal. This not only saves time and effort but also minimizes the impact on the environment, making foil packet cooking a sustainable choice for outdoor cooking.
So, the next time you embark on an outdoor adventure, consider incorporating foil packet cooking into your culinary repertoire. With its simplicity, versatility, and easy clean-up, this cooking technique is sure to elevate your outdoor dining experience and leave you with memories of flavorful meals enjoyed amidst the beauty of nature.
Turn a Tin Can into a Stove
Discover an ingenious trick to transform an ordinary tin can into a functional cooking stove during your outdoor escapades. This DIY hack allows you to create a compact and efficient cooking solution using readily available materials.
With just a few simple steps, you can repurpose an empty tin can into a versatile stove that can be used to cook meals, boil water, or even heat your camping area. This innovative solution is perfect for campers, hikers, and outdoor enthusiasts looking to maximize their cooking options while minimizing their equipment load.
To create your tin can stove, you will need a clean, empty tin can. Ensure that there are no sharp edges or remnants of its previous contents. Then, using a can opener or a sharp knife, carefully create a series of evenly spaced ventilation holes around the top of the can. These holes will supply the necessary oxygen for combustion and improve the stove’s efficiency.
Next, cut out a small opening near the bottom of the can, creating an access point for adding fuel and lighting the stove. This opening should be large enough to easily add twigs, small pieces of wood, or a commercially available solid fuel tablet. Remember, safety is paramount when handling flammable materials, so exercise caution when doing so.
| Materials: | Tools: |
|---|---|
| – Clean, empty tin can – Twigs or small pieces of wood – Solid fuel tablets (optional) |
– Can opener or sharp knife – Fire starter or matches |
Once you have prepared your tin can stove, it’s time to put it to the test. Place the stove on a stable, heat-resistant surface and add your chosen fuel through the bottom opening. Light the fuel using a fire starter or matches, taking care to control the flame and prevent any accidental wildfires.
As the fuel begins to burn, adjust the ventilation holes to regulate the airflow and control the intensity of the flame. This will allow you to achieve the desired heat for cooking or boiling water. Remember that tin can stoves can become very hot during operation, so exercise caution and use appropriate protective gear when handling the stove during use.
By repurposing a simple tin can, you have unlocked a practical cooking solution for your outdoor adventures. Enjoy the convenience and versatility of your homemade stove while savoring delicious meals in the heart of nature.
Clever Packing Tips
Packing efficiently is a smart way to make your camping trip hassle-free and enjoyable. Here are some clever tips to help you optimize your packing and maximize your space:
1. Streamline your wardrobe: Rather than taking a separate outfit for each day, consider versatile clothing options that can be mixed and matched for different occasions.
2. Utilize packing cubes: These handy organizers help to compartmentalize your belongings, making it easier to find what you need without rummaging through your entire bag.
3. Pack multi-purpose items: Look for items that can serve multiple functions, such as a camping knife that doubles as a bottle opener or a flashlight that can also be used as a lantern.
4. Roll your clothes: Rolling your clothes instead of folding them not only saves space but also helps to prevent wrinkles.
5. Use vacuum-sealed bags: Vacuum-sealed bags are a great way to compress bulky items like sleeping bags or pillows, allowing you to pack more efficiently.
6. Fill your shoes: Make use of the empty space inside your shoes by stuffing them with socks, underwear, or small accessories.
7. Pack travel-sized toiletries: Instead of bringing full-sized toiletries, opt for travel-sized versions to save space in your toiletry bag.
8. Invest in lightweight gear: Choose lightweight camping equipment to minimize the weight of your backpack without compromising on functionality.
9. Use ziplock bags: Ziplock bags are great for keeping small items organized and preventing any leaks from toiletries or other liquids.
10. Create a packing checklist: Before your trip, make a checklist of all the essential items you need to bring. This will help you stay organized and ensure that you don’t forget anything important.
By following these clever packing hacks, you can optimize your packing, save space, and have a stress-free camping adventure.
Roll Your Clothes for More Space
Maximize the available space in your camping bag by utilizing a simple yet effective strategy: rolling your clothes instead of folding them. This method not only saves space but also helps to keep your clothes organized and wrinkle-free, making it easier for you to find what you need quickly during your outdoor adventures.
By rolling your clothes, you can significantly reduce the amount of space they take up in your camping bag. This technique allows you to fit more clothing items into the same amount of space compared to folding. Additionally, rolled clothes tend to be more compact and can be tightly packed together, creating even more space for other essential camping gear.
Another advantage of rolling your clothes is that it prevents wrinkles. Traditional folding methods often result in creases and wrinkles, requiring you to spend time ironing or finding ways to smooth out your clothes. By rolling, you eliminate the need for ironing and ensure that your clothes remain neat and presentable throughout your camping trip.
To make the most out of this space-saving technique, consider using compression bags or packing cubes. Compression bags allow you to squeeze out excess air, further reducing the volume of your rolled clothes. Packing cubes, on the other hand, provide compartments to separate different types of clothing, making it easier to locate specific items without creating a mess inside your bag.
| Advantages | Disadvantages |
| – Maximizes available space | – Requires additional packing accessories (compression bags or packing cubes) |
| – Keeps clothes organized | – May take slightly longer to pack/unpack |
| – Prevents wrinkles | – May not be suitable for delicate or easily wrinkled fabrics |
Rolling your clothes for more space is a simple yet effective technique that can make a significant difference in your camping packing strategy. Give it a try, and you’ll be amazed at how much extra space you can create in your bag while keeping your clothes neat and ready to wear.
Questions and answers
How can I make a DIY lantern for camping?
To make a DIY lantern for camping, all you need is a headlamp and a water jug. Strap the headlamp around the jug with the light facing inward. The jug will act as a diffuser, spreading the light and creating a lantern effect. This hack is not only simple but also a great way to make use of items you already have.
What can I use to keep my toilet paper dry while camping?
To keep your toilet paper dry while camping, you can repurpose an old coffee canister. Simply remove the label from the canister, place your toilet paper roll inside, and secure the lid tightly. The coffee canister will protect your toilet paper from moisture and ensure that it remains dry throughout your outdoor adventure.
How can I save space and keep my clothes dry while camping?
To save space and keep your clothes dry while camping, try packing them in gallon-sized Ziploc bags. Roll your clothes tightly and place them inside a bag, then squeeze out any excess air before sealing it. This method not only compresses your clothes, saving space in your backpack, but also provides an additional layer of protection against moisture.
What can I do to repel mosquitoes while camping?
A natural mosquito repellent hack while camping is to burn sage in your campfire. Sage has natural insect-repelling properties that can help keep mosquitoes away. Simply toss a few sage leaves into your campfire and let the smoke do its magic. It’s an easy and environmentally-friendly way to enjoy a mosquito-free camping experience.
What are some genius camping hacks to simplify my outdoor adventure?
There are several genius camping hacks that can simplify your outdoor adventure. Here are 10 of them: 1. Use an empty, cleaned laundry detergent dispenser to store and dispense water. 2. Make a DIY lantern by strapping a headlamp to a water bottle filled with water. 3. Use a pool noodle to create a makeshift clothesline. 4. Create your own fire starters by dipping cotton pads into melted wax. 5. Use a muffin tin to cook perfectly portioned meals over the campfire. 6. Use a foam floor mat as a comfortable sleeping pad. 7. Wrap duct tape around a water bottle or trekking pole to have it handy in case of emergencies. 8. Use a plastic shoe organizer to store and organize your camping gear. 9. Use a shower cap to cover your shoes and keep your tent clean. 10. Freeze water bottles to use as ice packs and as a source of drinking water as they melt.
How can I store and dispense water while camping?
A great hack for storing and dispensing water while camping is to repurpose an empty, cleaned laundry detergent dispenser. These containers are usually made of durable plastic and have a spout that makes pouring water easier. Simply clean out the dispenser thoroughly, fill it up with water, and securely close the lid. You can then use the spout to pour water for drinking, cooking, or any other camp-related activities. This hack makes it convenient to have a large supply of water readily available without the need for bulky containers.
What is a simple DIY lantern hack for camping?
A simple DIY lantern hack for camping involves using a headlamp and a water bottle. All you need to do is strap the headlamp around a 1 or 2-liter water bottle filled with water. The headlamp, when turned on and facing the bottle, will illuminate the water, creating a bright and diffused light source. This makeshift lantern can be hung inside your tent or placed on a flat surface to provide adequate lighting during your camping trip. It’s a lightweight and cost-effective solution to ensure you have enough light during the nighttime.
How can I keep my tent clean while camping?
To keep your tent clean while camping, a helpful hack is to use shower caps to cover your shoes. Before entering the tent, simply slip disposable shower caps over your shoes to prevent dirt, mud, or debris from getting inside. This will help keep the interior of your tent clean and dry, allowing you to enjoy a more comfortable camping experience. Additionally, you can place a small doormat or tarp outside the entrance of the tent to wipe your feet on before entering, further minimizing dirt and mess.
What can I use as fire starters for camping?
One creative and cost-effective hack for fire starters while camping is to make your own using cotton pads and melted wax. Simply dip cotton pads or balls into melted wax, ensuring they are fully coated, and let them dry. These homemade fire starters can be easily ignited and placed in your campfire to help get the flames going. They are lightweight, compact, and waterproof, making them perfect for camping. Keep your homemade fire starters in a waterproof bag or container to ensure they stay dry and ready for use.