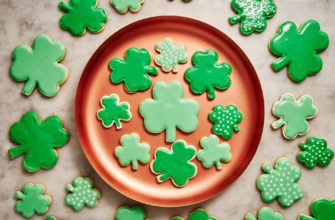
With the arrival of the joyous celebration just around the corner, it’s time to truly immerse ourselves in the delights that Easter brings. Amidst the colorful festivities and the joyful gatherings, one cannot overlook the tantalizing array of delectable treats that grace our tables, filling the air with a sweet aroma that tickles our senses. Amongst these mouthwatering indulgences, the art of decorating Easter cookies with ornate designs, using the renowned technique of royal icing, steals the spotlight.
Steeped in tradition and intricacy, the art of embellishing Easter cookies with intricate detailing has been passed down through generations, adding a touch of elegance to our festive feasts. This creative endeavor offers a captivating experience, enticing both the young and the young at heart to unleash their inner artist. Fondant frosting, piped icings, and edible embellishments come together harmoniously to transform simple cookies into edible masterpieces that not only delight the eyes but also promise an explosion of flavors.
As you embark upon the journey of discovering the mesmerizing world of regal icing and its myriad of possibilities, you will be enchanted by the endless opportunities to express your creativity. From adorning cookies with vibrant floral motifs to recreating intricate Easter-themed designs, your canvas knows no bounds. The intoxicating blend of artistic expression and culinary expertise presents a platform where imagination can soar and joy can be molded into delicious works of art.
Discover the Delight of Decorating Easter Cookies
Uncover the joy and excitement of transforming plain Easter cookies into works of art with the creative and fun-filled process of decorative icing! Dive into the world of Easter cookie decorating and unlock the potential for endless creativity and delicious treats.
Immerse yourself in a delightful experience as you explore the various techniques and tools used to bring your Easter cookies to life. From simple patterns and designs to intricate details, discover the endless possibilities of decorating cookies with icing.
Get ready to unleash your imagination as you experiment with different colors, textures, and techniques to create stunning Easter-themed cookies that are sure to impress family and friends. Discover the joy of mixing and matching vibrant hues to capture the essence of Easter, from pastel shades to bold and vibrant tones.
Learn from experts in the field as they share their tips, tricks, and insider secrets to help you perfect your cookie decorating skills. Discover the power of using various icing consistencies to achieve different effects, from smooth and glossy finishes to intricate textured designs.
Discover the satisfaction of seeing your creations come to life as you add the final touches and watch your Easter cookies transform into edible artworks. Capture the essence of the season, from adorable bunnies and colorful eggs to whimsical spring flowers and charming Easter scenes.
Embark on a journey of creativity, fun, and deliciousness as you delve into the delightful world of decorating Easter cookies. Whether you’re a seasoned pro or a beginner in the world of cookie decorating, there’s something for everyone to discover and enjoy.
So, grab your piping bags, icing tips, and sprinkles, and let your creativity soar as you embark on an unforgettable Easter cookie decorating adventure!
Unlock Your Creativity

Discover the art of unleashing your creative potential and taking your Easter cookie decorating to the next level. In this section, we will explore various techniques and ideas to help you think outside the box and create unique designs that will impress your loved ones.
1. Embrace Unconventional Colors:
- Step away from traditional pastel hues and experiment with vibrant shades. Think bold blues, striking purples, and fiery oranges to add a modern twist to your Easter cookie designs.
- Consider incorporating metallic finishes like gold and silver for an elegant touch. These unexpected colors will make your cookies stand out and showcase your artistic flair.
2. Play with Patterns:
- Break away from the typical bunny and egg shapes and try out new patterns. Opt for intricate geometric designs, floral motifs, or abstract shapes to add a contemporary feel to your cookie decorations.
- Combine different patterns on one cookie for a visually captivating effect. Mix and match stripes, dots, and swirls to create a stunning masterpiece.
3. Add Texture and Dimension:
- Elevate your cookie designs by incorporating different textures and layers. Use edible glitter, sanding sugar, or colored sprinkles to add sparkle and depth to your creations.
- Experiment with piping techniques to create raised patterns and textures. Try using a variety of piping tips to achieve different effects like ruffles, dots, or lace-like details.
4. Personalize with Edible Art:
- Express your creativity by painting on your cookies with edible food coloring. Use small brushes or food-safe markers to add intricate designs, personalized messages, or even mini portraits.
- Consider incorporating edible wafer paper or edible images to create unique and customized toppers for your Easter cookies. This will make your treats truly one-of-a-kind.
By embracing unconventional ideas, playing with colors, patterns, and textures, and adding personalized touches, you can unlock your creativity and transform your Easter cookies into edible works of art. Let your imagination soar and create masterpieces that will delight and impress everyone who takes a bite.
Elevate Your Baking Skills
Enhance your abilities in the art of baking by exploring new techniques and honing your skills. Discover innovative methods and tricks that will take your baking to the next level. Expand your knowledge and expertise to create beautiful and delicious treats that will impress friends and family.
Unleash your creativity and experiment with a wide range of ingredients and flavors. From experimenting with different types of flours to incorporating unique spices and extracts, the possibilities are endless. Embrace the challenge of trying new recipes and adapt them to your personal taste preferences.
Master the science behind baking by understanding the role of each ingredient and how they interact with one another. Develop a firm understanding of the importance of precise measurements, temperature control, and baking times. Explore the world of leavening agents, emulsifiers, and stabilizers to create perfectly textured and balanced baked goods.
Refine your decorating skills and transform your baked creations into stunning works of art. Learn techniques such as piping, icing, and fondant sculpting to bring your desserts to life. Experiment with different colors, shapes, and designs to add a touch of personal flair to your treats.
Expand your repertoire by exploring international baking traditions and incorporating them into your own creations. Discover the rich flavors and unique techniques behind French pastries, Italian desserts, and more. Broaden your cultural knowledge and explore the diverse world of baking.
Immerse yourself in the world of baking by learning from experienced chefs and pastry artists. Attend workshops and classes to gain hands-on experience and expert guidance. Network with fellow baking enthusiasts to exchange ideas, tips, and inspiration. Embrace the joy of continuous learning and improvement in your baking journey.
Elevate your baking skills and unlock your full potential as a pastry artist. With dedication, passion, and a commitment to learning, you can create masterpieces that will leave a lasting impression on every sweet tooth.
Master the Art of Royal Icing
In this section, we will delve into the intricacies of perfecting the skillful technique of working with royal icing. With its smooth texture and glossy finish, royal icing adds a touch of elegance to any baked creation. Uncover the secrets of this versatile icing, and unlock your creativity in the world of baking.
To master the art of royal icing, it is essential to understand the key components and their roles. The basic recipe typically consists of confectioners’ sugar, egg whites or meringue powder, and flavoring. These ingredients combine to create a thick, smooth consistency that is ideal for creating intricate designs and decorations.
One of the main benefits of royal icing is its ability to set and harden. This unique property allows for the creation of three-dimensional designs and intricate detailing that can elevate the overall appearance of your baked goods. Whether you are adorning cookies, cakes, or cupcakes, mastering the art of royal icing will open doors to endless creative possibilities.
- Explore Different Consistencies: Experiment with the consistency of your royal icing to achieve different effects. Thicker icing is perfect for outlining and creating borders, while thinner icing is ideal for flooding and filling in larger areas.
- Master Piping Techniques: Learn various piping techniques such as outlining, flooding, and detailing to enhance the beauty of your designs. Practice steady hand movements and control to create flawless lines and intricate patterns.
- Add Color and Flair: Discover the world of food coloring and edible decorations to add vibrant hues and creative flair to your royal icing creations. From pastel shades to bold and vivid colors, let your imagination run wild.
- Experiment with Texture: Play around with different texture techniques such as marbling, stippling, and stenciling to give your royal icing designs a unique and artistic touch.
With dedication and practice, you can become a master of royal icing and take your baking skills to new heights. Let your creativity shine as you decorate Easter cookies, cakes, and other treats with the artful precision of royal icing. Elevate your baking game and leave a lasting impression on your friends and family with stunningly decorated creations.
Perfecting the Consistency
In the pursuit of creating beautiful and delicious Easter cookies, one of the essential factors to consider is the consistency of the royal icing used for decoration. Achieving the perfect consistency is crucial in order to create intricate designs, smooth finishes, and precise details on your cookies. Understanding the different consistencies of royal icing and knowing how to adjust it accordingly will greatly elevate your cookie-decorating skills.
When working with royal icing, consistency refers to its thickness and flow. A consistent icing allows for better control during the decorating process, ensuring that your designs come out exactly as you envision them. There are three main consistencies to consider: flooding, piping, and stiff.
Flooding consistency is the thinnest of the three, with a smooth and liquid-like texture. It is ideal for covering larger areas of the cookie and creating a base layer of icing. Piping consistency, on the other hand, is thicker and more viscous. It holds its shape well and is perfect for outlining and adding details to your designs. Stiff consistency is the thickest of all, with a paste-like texture. It is best suited for creating intricate decorations, such as flowers, bows, and other elaborate designs.
Adjusting the consistency of royal icing can be done by adding more water or powdered sugar, depending on whether you need to thin it out or thicken it. To achieve flooding consistency, gradually add small amounts of water to the icing and mix well until it reaches the desired smooth consistency. If the icing becomes too thin, add more powdered sugar to thicken it. For piping and stiff consistencies, add powdered sugar to the icing until it becomes thick enough to hold its shape when piped.
Mastering the art of perfecting the consistency allows you to take your Easter cookie decorating to the next level. Experimenting with different consistencies and understanding how they affect the outcome of your designs will give you more control and confidence in creating stunning and professional-looking cookies.
| Consistency | Description | Example Use |
|---|---|---|
| Flooding | Thin and liquid-like | Covering larger areas |
| Piping | Thicker and viscous | Outlining and adding details |
| Stiff | Thickest with a paste-like texture | Creating intricate decorations |
Mastering the Piping Techniques
Enhance your skills in creating beautifully decorated Easter cookies with the mastery of piping techniques. As you embark on your creative journey, it is important to explore various methods of applying icing to achieve professional-level results. This section will guide you through the art of piping, allowing your Easter treats to stand out and delight everyone.
When it comes to decorating cookies, piping is the key technique that allows you to add intricate details and designs. Utilizing different piping tips and mastering the pressure control are essential elements for achieving precise lines, shapes, and patterns. By understanding the various piping techniques, you will be equipped with the skills to create stunning Easter cookie decorations.
To begin your mastery of the piping techniques, it is crucial to familiarize yourself with the different types of icing consistencies. Thin, medium, and thick consistencies each serve their purpose in creating specific effects. Thin icing is ideal for outlining the design and creating delicate details, while medium and thick consistencies are perfect for filling larger spaces and adding texture.
Another important aspect of piping techniques is the choice of piping tips. Depending on the desired effect, you can select from a variety of tips, including round, star, leaf, or petal tips. Each tip offers a unique shape and texture, allowing you to bring your creative vision to life. Experimenting with different tips will help you discover new possibilities for decorating your Easter cookies.
Practice makes perfect when it comes to mastering piping techniques. Start by practicing basic lines and shapes on parchment paper before moving on to actual cookies. Remember to maintain a steady hand and apply consistent pressure to ensure even and smooth piping. With dedication and patience, you will improve your skills and create stunning Easter cookie decorations.
Finally, don’t forget to incorporate your unique style and creativity into your designs. Piping techniques provide the foundation, but it is your artistic touch that will truly elevate your Easter treats. Experiment with different color combinations, patterns, and themes to make your cookies stand out and delight both young and old alike.
In conclusion, mastering the art of piping techniques will allow you to create beautifully decorated Easter cookies that impress and delight. Understanding icing consistencies, utilizing different piping tips, and practicing with dedication will enhance your skills and enable you to bring your creative vision to life. So let your imagination run wild and have fun as you elevate your Easter cookie decorating game!
Embrace the Art of Flooding

Discover the fascinating technique of flooding when it comes to decorating your Easter cookies with royal icing. This artistic method involves creating a smooth and even surface on your cookies by covering them with a thin layer of icing. By embracing the art of flooding, you can elevate your cookie decorations to the next level and impress your friends and family with professional-looking treats.
|
Understanding the Basics Before diving into the intricacies of flooding, it’s important to have a solid understanding of the basics. Royal icing, a sweet and smooth icing made with powdered sugar and egg whites, is the go-to choice for flooding due to its ability to dry hard and shiny. To achieve the perfect consistency for flooding, you’ll need to adjust the thickness of the icing by adding small amounts of water or lemon juice. The ultimate goal is to create an icing that is thin enough to smoothly spread over the cookie but thick enough to hold its shape and not run off the edges. |
Tools of the Trade Mastering the art of flooding requires a few essential tools. A piping bag fitted with a small, round tip is ideal for applying the icing to your cookies. An offset spatula or a small angled palette knife is also handy for spreading the icing evenly. Additionally, having toothpicks or small scribe tools on hand can help you achieve precise details and remove any air bubbles from the icing. With these tools at your disposal, you’ll be well-prepared to create stunning flooded designs. |
|
Perfecting the Technique Flooding cookies with royal icing requires a methodical approach to ensure consistent results. Start by outlining the shape of your cookie with a thicker icing consistency known as piping icing. Allow the outline to dry completely before moving onto the flooding stage. Once the outline is dry, fill the center of the cookie with your prepared flood icing, using the piping bag or a spoon to evenly distribute the icing. Use the offset spatula or angled palette knife to gently spread the icing to the edges, being careful not to disturb the outline. The icing will naturally settle and create a smooth surface as it dries, resulting in a beautiful flooded cookie. |
Unleash Your Creativity Flooding provides endless opportunities for creativity and personal expression. Experiment with different colors, designs, and techniques to create unique and eye-catching Easter cookies. Add dimension to your flooded cookies by layering different colors or using edible markers and paints to add intricate details. With practice, you’ll become more confident in your flooding abilities and gain the freedom to explore new artistic possibilities. |
So, don’t be afraid to embrace the art of flooding and take your Easter cookie decorations to new heights. With a little practice and a lot of creativity, you’ll be able to create stunning edible masterpieces that will delight both the young and the young at heart.
Questions and answers
What is royal icing?
Royal icing is a type of icing made from egg whites or meringue powder, powdered sugar, and sometimes lemon juice or cream of tartar. It is commonly used to decorate cookies, cakes, and other baked goods.
How do I make royal icing for decorating Easter cookies?
To make royal icing for decorating Easter cookies, you will need 3 egg whites, 4 cups of powdered sugar, and 1 teaspoon of lemon juice. Beat the egg whites until they form stiff peaks, then gradually add in the powdered sugar and lemon juice. Continue beating until the icing is smooth and glossy.
Can I use food coloring to tint the royal icing?
Yes, you can use food coloring to tint the royal icing. Gel or paste food coloring works best, as it doesn’t add excess moisture to the icing. Start with a small amount of coloring and gradually add more until you achieve the desired shade. Remember to mix well to distribute the color evenly.
How long does it take for royal icing to dry?
The drying time of royal icing can vary depending on factors such as humidity and thickness of the icing. Generally, it takes about 6-8 hours for royal icing to dry completely and harden. However, it’s recommended to let the decorated cookies sit overnight to ensure they are fully dry before handling or packaging.
What is royal icing?
Royal icing is a type of icing that is commonly used to decorate cookies and cakes. It is made by mixing powdered sugar with egg whites or meringue powder, resulting in a smooth and glossy icing that hardens when it dries.
How do I make royal icing?
To make royal icing, you will need powdered sugar, egg whites or meringue powder, and water. Start by sifting the powdered sugar to remove any lumps. In a mixing bowl, whisk the egg whites or meringue powder with water until frothy. Gradually add the sifted powdered sugar and continue whisking until the icing reaches your desired consistency.
What are some tips for decorating cookies with royal icing?
When decorating cookies with royal icing, make sure your cookies are completely cooled before icing them. Use a piping bag with a small round tip for outlining the shapes and a slightly larger tip for filling in the cookies. Let the outlines dry for a few minutes before flooding the inside with a thinner icing. You can also add food coloring to the icing for a more vibrant effect. Lastly, don’t forget to have fun and get creative with your designs!
How long does it take for royal icing to dry?
The drying time of royal icing depends on various factors, such as the humidity of the environment and the consistency of your icing. Generally, it takes around 6 to 12 hours for royal icing to dry completely. However, it’s best to let the cookies sit overnight to ensure that the icing sets and hardens properly.
Can I store cookies decorated with royal icing?
Absolutely! Once the royal icing has dried completely, you can store the decorated cookies in an airtight container. They will stay fresh for several days, making them perfect for gifting or enjoying yourself. Just make sure to layer the cookies with parchment paper or wax paper to prevent them from sticking together.