Looking for ways to add a dash of novelty and amusement to your Easter celebrations? Why not embark on a culinary adventure that both you and your children will cherish? This article will introduce you to a myriad of delectable desserts that are not only simple to prepare but also guarantee an extraordinary bonding experience.
Unleash your imagination and dive into the world of DIY desserts, where ambiance and creativity intertwine. From delightful cupcakes bursting with vibrant colors to whimsical cookies that transport you to a land of enchantment, the possibilities are truly endless. These recipes offer a perfect platform to unleash your ingenuity and relish the joy of creating something delicious from scratch.
With each recipe, you will embark on a unique journey, exploring a diverse range of flavors, textures, and decorations. Enchant your taste buds with luscious bites infused with citrusy zests or indulge in the velvety smoothness of creamy fillings. Allow your children to join you in discovering the wonders of the kitchen, as they develop their artistic flair and deepen their passion for culinary experimentation.
Moreover, these sweet treats are not just pleasing to the eye and palate, but they also serve as an opportunity to educate and entertain your little ones. Every step is an opportunity for learning: from measuring ingredients to mixing and decorating, you will foster their cognitive development, hone their motor skills, and ignite their curiosity about the magical world of cooking.
- Delicious and Creative Easter Dessert Recipes for a Fun-filled Holiday
- Indulge in Sweet Treats with These Simple DIY Recipes
- Chocolate Easter Egg Nests
- Create edible chocolate nests with your kids using crispy cereal, melted chocolate, and mini eggs.
- Bunny-Shaped Carrot Cake
- Bake a carrot cake in the shape of an adorable bunny and decorate it with cream cheese frosting.
- Colorful Easter Bunny Cupcakes
- Make vibrant cupcakes that resemble cute bunnies with colorful frosting, edible ears, and candy eyes.
- Questions and answers
Delicious and Creative Easter Dessert Recipes for a Fun-filled Holiday
Indulge in the ultimate sweetness this Easter with a selection of delectable and imaginative dessert recipes that will make your holiday celebration truly memorable. From chocolate creations to fruity delights, these recipes will not only satisfy your taste buds but also provide a fun activity to engage in with your loved ones.
Start off with a whimsical twist on a classic favorite – the Easter Bunny Cupcakes. These adorable treats feature moist vanilla cupcakes adorned with cute bunny decorations made from marshmallows, candy, and edible decorations. The kids will have a blast helping you assemble these delightful little bunnies, while also developing their fine motor skills and creativity.
For a burst of vibrant colors and flavors, try making Rainbow Jello Eggs. This visually stunning dessert showcases layers of colorful jello arranged to resemble Easter eggs. It’s a simple yet captivating recipe that will surely impress your guests. Get the kids involved in pouring each layer of jello and watch their faces light up as the vibrant colors come together to create a festive dessert.
If you’re a fan of traditional Easter treats, why not put a unique spin on the classic Hot Cross Buns? Experiment with different flavors by adding a twist of lemon zest, dried cranberries, or even a sprinkle of chocolate chips. These comforting and aromatic buns are perfect for a cozy Easter breakfast or afternoon snack, and the whole family can participate in kneading the dough and shaping the buns.
| Recipe | Ingredients | Instructions |
|---|---|---|
| Easter Bunny Cupcakes |
|
|
| Rainbow Jello Eggs |
|
|
| Hot Cross Buns |
|
|
These delightful Easter dessert recipes will not only satisfy your sweet tooth but also bring joy and creativity to your holiday festivities. So gather your loved ones, put on your aprons, and get ready for a fun-filled and delicious Easter celebration!
Indulge in Sweet Treats with These Simple DIY Recipes
Delight your taste buds and satisfy your sweet tooth with these delectable homemade treats that are sure to impress. Embark on a delicious culinary adventure with these straightforward do-it-yourself recipes that will make your mouth water. Discover a medley of delightful confections that are both satisfying and easy to create. Prepare to indulge in a sugary utopia with desserts that are bursting with flavor and crafted with love.
Experience the joy of making your own sweet creations as you dive into these enticing recipes that are perfect for any occasion. Give in to your inner chef and create tantalizing treats that will be the envy of your family and friends. From ooey-gooey chocolate chip cookies to luscious strawberry shortcakes, these simple recipes are guaranteed to make your taste buds dance with delight.
Unleash your creativity as you experiment with various ingredients and decorations to make these DIY desserts truly unique. Whether you prefer a touch of whimsy or a more elegant presentation, there is a recipe here to suit your taste and style. Let your imagination run wild and add your personal flair, turning these simple treats into works of art.
Get ready to impress your loved ones with your exceptional baking skills as you whip up these delightful treats. Enjoy the process of creating something special with your own hands and seeing the smiles of those who indulge in your sweet masterpieces. Go beyond store-bought desserts and create memories that will last a lifetime with these simple but extraordinary DIY recipes.
So, why wait? It’s time to dive into the world of homemade desserts and savor the sweet satisfaction that comes with creating something extraordinary. Treat yourself to these simple DIY recipes and let the joy of baking fill your home with warmth and love. Gather your ingredients, put on your apron, and get ready to embark on a culinary adventure that will leave you craving more.
Chocolate Easter Egg Nests
Crafted with the finest quality chocolate, Chocolate Easter Egg Nests are a delightful blend of sweetness and crunch. The center is filled with colorful egg-shaped candies, adding a burst of vibrant flavors to each bite. The texture of the nests is achieved by combining cereal or pretzel sticks with melted chocolate, providing a unique and enjoyable experience for your taste buds.
To begin, melt the chocolate until it reaches a smooth and silky consistency. You can choose from a variety of chocolate options such as milk, dark, or white chocolate, depending on your preferences. Once melted, gently fold in the cereal or pretzel sticks, allowing the ingredients to fully coat and amalgamate. Carefully shape the mixture into nest-like molds, creating small wells in the center to cradle the vibrant candy eggs.
Now comes the exciting part – decorating your Chocolate Easter Egg Nests! Let your imagination run wild as you adorn each nest with colorful sprinkles, edible glitter, or even miniature fondant flowers. The possibilities are endless, and this is a perfect opportunity for your little ones to showcase their creativity. Allow the nests to set in the refrigerator for a few hours, and voilà, your homemade Chocolate Easter Egg Nests are ready to be enjoyed.
| Ingredients: |
|---|
| – Chocolate |
| – Cereal or pretzel sticks |
| – Colorful candy eggs |
| – Decorative sprinkles or edible glitter |
| – Miniature fondant flowers (optional) |
These delightful Chocolate Easter Egg Nests are not only a fun and interactive way to celebrate the joyous occasion but also make for a delectable treat that the whole family can enjoy. So why wait? Gather your ingredients, gather your little ones, and get ready to embark on a sweet and memorable Easter adventure together!
Create edible chocolate nests with your kids using crispy cereal, melted chocolate, and mini eggs.
Indulge in a delightful and interactive activity this Easter by making edible chocolate nests with your little ones. This fun and easy DIY project will not only keep your kids entertained but also result in a scrumptious treat that everyone can enjoy. Using crispy cereal, melted chocolate, and mini eggs, you can create adorable nests that are as delicious as they are cute.
To start, gather all the necessary ingredients, including your favorite crispy cereal, such as cornflakes or rice puffs. Break them into smaller pieces to resemble twigs and branches, adding a natural touch to the nests. As an alternative, you can use pretzel sticks to add a salty crunch and a unique twist to the traditional recipe.
Next, melt some chocolate in a microwave-safe bowl or over a double boiler. Choose your favorite chocolate, whether it’s dark, milk, or white, to add different flavors and colors to your nests. Once the chocolate is silky smooth and fully melted, pour it over the cereal and mix until every piece is evenly coated. This step requires adult supervision, as melted chocolate can be hot.
- Gently scoop the chocolate-coated cereal mixture into small piles on a lined baking sheet or into a cupcake tin lined with paper cases. Use the back of a spoon or your fingers to shape the piles into nest-like forms, creating a hollow center for the eggs to be placed later.
- Place the nests in the refrigerator for about 30 minutes to allow the chocolate to set and harden. This will help the nests hold their shape and prevent them from falling apart when handling.
- After the nests have chilled, it’s time to add the finishing touch – mini eggs! These colorful and bite-sized treats will bring a pop of sweetness to the nests and make them look even more festive. Place a few mini eggs in the center of each nest, arranging them in a neat and visually appealing pattern. You can use different-colored eggs to create a vibrant and eye-catching display.
Once your edible chocolate nests are complete, it’s time to indulge in this delightful creation. Serve them as a playful Easter dessert or as an interactive centerpiece during a festive gathering. Enjoy the combination of crispy cereal, rich melted chocolate, and the delightful surprise of mini eggs in every bite. Get creative and experiment with different variations, such as adding edible grass or marshmallow chicks, to make the nests even more unique and personalized.
Creating edible chocolate nests with your kids is not only a fun activity but also a wonderful opportunity to bond and create lasting memories. So gather your little ones, put on your aprons, and let your imagination run wild as you embark on this delicious Easter adventure together!
Bunny-Shaped Carrot Cake
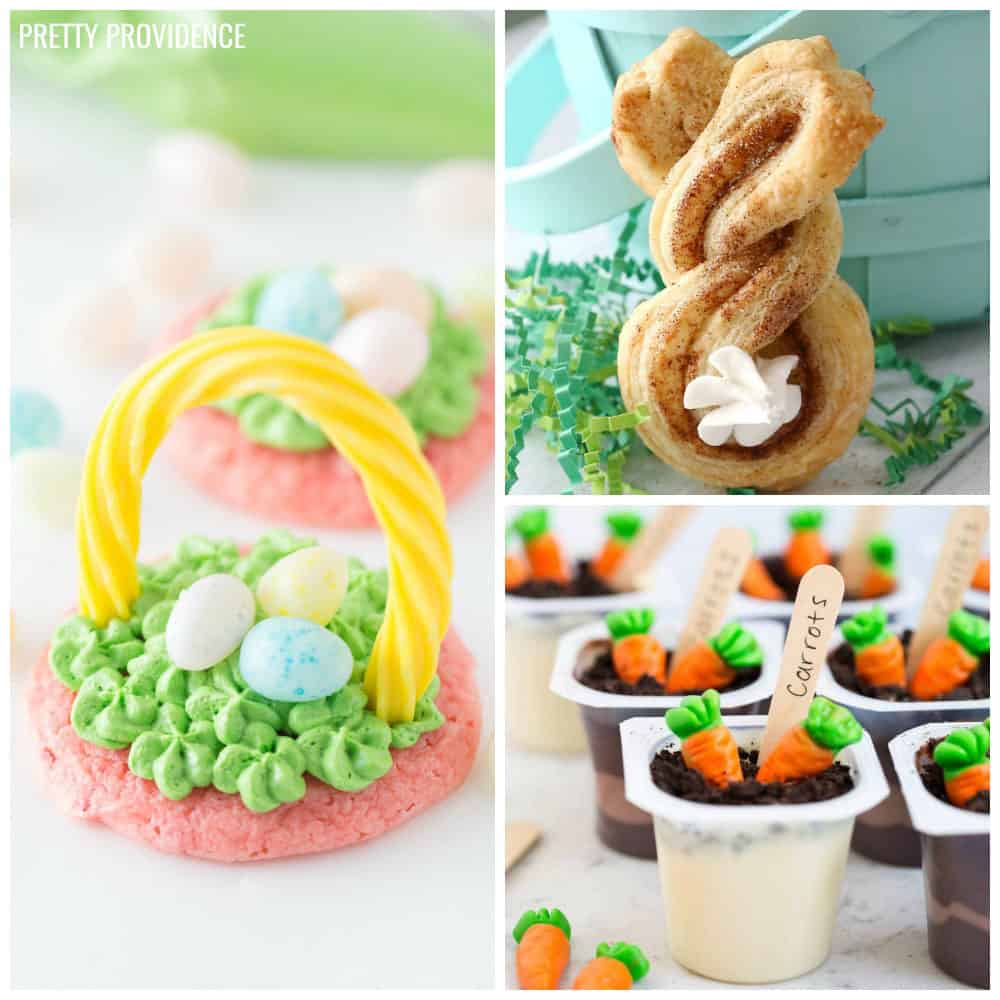
Indulge in a delightful and whimsical treat this Easter with our Bunny-Shaped Carrot Cake. This adorable dessert combines the goodness of a classic carrot cake with a playful twist, perfect for bringing joy to both young and old.
If you’re looking to surprise your loved ones with a unique and delicious Easter treat, look no further than this Bunny-Shaped Carrot Cake. With its fluffy and moist texture, rich carrot flavor, and charming bunny shape, it’s sure to be a hit at any Easter celebration.
This bunny-shaped cake is not only visually appealing but also easy to make. Begin by preparing a traditional carrot cake batter, bursting with grated carrots, warm spices, and a hint of sweetness. The batter is then poured into a bunny-shaped cake mold, allowing it to bake into a delightful bunny-shaped cake.
Once the cake is baked and cooled, it’s time to get creative with the decorating! Use fluffy white cream cheese frosting to cover the entire cake, giving it a smooth and velvety appearance. Then, use vibrant pastel-colored fondant to create the bunny’s features, such as its ears, eyes, and nose. Feel free to add extra touches, like a bowtie or a carrot in its paw, to give your bunny cake even more personality.
As you slice into the Bunny-Shaped Carrot Cake, you’ll be greeted with a moist and flavorful interior. Each bite reveals the perfect balance of sweetness from the carrots and a delightful hint of cinnamon and nutmeg. The combination of textures and flavors is truly a treat for the taste buds.
Whether you’re hosting an Easter brunch or surprising your family with a special dessert, this Bunny-Shaped Carrot Cake is a unique and whimsical way to celebrate the season. Get ready to impress your guests with this delightful creation that will surely bring smiles and joy to all.
Bake a carrot cake in the shape of an adorable bunny and decorate it with cream cheese frosting.
>
In this section, we will explore a delightful and creative way to celebrate Easter by baking a delectable carrot cake in the form of an irresistibly cute bunny. This fun and engaging activity will not only satisfy your taste buds but also allow you to express your culinary skills alongside your little ones. Using a moist and flavorful carrot cake recipe, we will guide you through the process of shaping the cake into a charming bunny figure. The finishing touch will be the luscious cream cheese frosting, which adds a creamy and tangy element to the overall experience.
Begin by gathering the necessary ingredients, such as carrots, flour, sugar, eggs, and spices. Grate the carrots finely, ensuring they contribute to the cake’s moistness and soft texture. Combine the grated carrots with the other ingredients to create a smooth and well-blended batter. To transform the cake into a bunny shape, use a bunny-shaped cake mold or carefully carve the cake into the desired form once baked. Here comes the exciting part – decorating the bunny cake!
Prepare the cream cheese frosting by whipping together cream cheese, butter, powdered sugar, and a dash of vanilla extract. The velvety texture and tangy flavor of the frosting perfectly complement the carrot cake’s sweetness. Spread a generous layer of cream cheese frosting all over the cake, ensuring it covers every nook and cranny. Feel free to get creative with the frosting – add different colors using natural food dyes, or use decorating tools to create intricate designs and patterns on the bunny’s surface.
Once the cake is fully decorated, serve it to your family and friends, and watch as their faces light up with joy. The combination of the moist carrot cake, the creamy cream cheese frosting, and the adorable bunny shape will undoubtedly be a hit, making this Easter celebration even more special. So gather your little ones, let your creativity shine, and enjoy this delightful baking adventure!
Colorful Easter Bunny Cupcakes
Dive into the joyous spirit of Easter with these delightful and vibrant bunny cupcakes that are sure to bring smiles to everyone’s faces. This creative dessert idea allows you to express your artistic talents while spending quality time with your little ones in the kitchen.
These colorful Easter bunny cupcakes are a fantastic way to add a touch of festive flair to your table. The cute bunny designs are created using a combination of scrumptious ingredients and simple decoration techniques, making them a perfect project for families to enjoy together.
To create these adorable treats, start by baking a batch of your favorite cupcake flavor. Whether you prefer classic vanilla or decadent chocolate, the choice is yours! While the cupcakes cool, gather an assortment of pastel-colored frosting and edible decorations such as small candies, sprinkles, and marshmallows.
Get ready to bring your bunnies to life by first frosting each cupcake generously with a vibrant hue, such as baby blue, spring green, or sunny yellow. Let your imagination run wild as you experiment with different shades and textures to give your bunny cupcakes a personalized touch.
Next, it’s time to transform your cupcakes into adorable bunnies. Use mini marshmallows to create the bunny’s ears, placing them strategically on top of the frosting. Add eyes and a nose using small candies, and pipe on a cute mouth with colored frosting. For an extra special touch, scatter a few colorful sprinkles on the frosting to bring your bunny cupcakes to life.
A perfect activity for all ages, decorating these colorful Easter bunny cupcakes is a creative way to bond with your loved ones and indulge in some delicious treats. Remember to take plenty of photos of your masterpieces before enjoying these delightful Easter desserts together.
| Ingredients: |
|---|
| – Cupcake batter of your choice |
| – Assorted pastel-colored frosting |
| – Mini marshmallows |
| – Small candies for eyes and nose |
| – Colorful sprinkles |
Make vibrant cupcakes that resemble cute bunnies with colorful frosting, edible ears, and candy eyes.
In this section, we will explore a delightful and imaginative way to create adorable bunny-themed cupcakes that are sure to impress both children and adults alike. By using vibrant frosting in various colors and adding edible ears and candy eyes, you can transform simple cupcakes into cute bunnies that will surely bring a smile to everyone’s face.
To begin, choose your favorite cupcake recipe and bake a batch of fluffy cupcakes. Make sure to let them cool completely before proceeding. Once cooled, it’s time to unleash your creativity and start decorating.
- First, prepare the colorful frosting by dividing it into separate bowls and adding food coloring to achieve the desired shades. Pastel colors work exceptionally well for creating an Easter-inspired ambiance.
- Next, spread a generous amount of frosting on top of each cupcake, using a frosting spatula or butter knife for a smooth finish.
- To create the bunny ears, gather some edible decorations such as cookie wafers or fondant in various colors. Cut out ear shapes and carefully insert them into the frosting, near the top of each cupcake. You can experiment with different shapes and sizes to add variety to your bunny cupcakes.
- Now it’s time to add the finishing touch – the candy eyes. Using small round candies or chocolate chips, place two eyes just below the ears on each cupcake. This will bring your bunny cupcakes to life and add an adorable touch to their appearance.
Once you have completed decorating all the cupcakes, take a step back and admire your creation. These vibrant bunny cupcakes will certainly become the highlight of any Easter celebration or gathering. Not only are they visually appealing, but they also taste delicious, making them a perfect treat for the holiday.
Whether you’re a seasoned baker or a novice in the kitchen, these bunny cupcakes are a fun and enjoyable project to undertake with children. Not only will they provide an opportunity for kids to unleash their creativity, but they also offer an excellent way to bond and create lasting memories.
So, gather your little ones and embark on a cupcake-decorating adventure. With colorful frosting, edible ears, and candy eyes, you can make vibrant cupcakes that resemble cute bunnies, ensuring laughter and joy this Easter.
Questions and answers
What are some easy dessert recipes to make with kids for Easter?
There are plenty of easy dessert recipes that you can make with kids for Easter. Some ideas include making Easter cupcakes, bunny-shaped cookies, Rice Krispies treats decorated as Easter eggs, fruit skewers with marshmallow bunnies, and homemade chocolate eggs with various fillings.
What are some fun ideas for decorating homemade chocolate eggs?
Decorating homemade chocolate eggs can be a lot of fun! Some ideas include using colored icing to create intricate designs, using edible food markers to draw on the eggs, dipping the eggs in melted chocolate of different colors, adding sprinkles or edible glitter, or even using edible paints to create unique patterns and designs. Let your creativity run wild!
Are there any allergy-friendly alternatives for these dessert recipes?
Absolutely! There are alternatives for those with dietary restrictions or allergies. For example, you can substitute all-purpose flour with gluten-free flour for gluten allergies. You can also use dairy-free butter or margarine for those with lactose intolerance. Additionally, there are vegan-friendly options available for ingredients like eggs and milk. It’s important to carefully read labels and choose ingredients that cater to the specific dietary needs of you and your family.
What are some easy dessert recipes to make with kids for Easter?
There are several easy and fun DIY dessert recipes that you can make with kids for Easter. Some ideas include Easter-themed cupcakes, chocolate nests with mini eggs, bunny-shaped cookies, colorful marshmallow pops, and carrot-shaped cake pops.
Are these dessert recipes suitable for all ages of kids?
Yes, these dessert recipes are suitable for kids of all ages. Younger children can assist with simpler tasks such as mixing ingredients or decorating, while older kids can handle more complex steps like baking or shaping the desserts.
Where can I find the recipes for these Easter desserts?
You can find the recipes for these Easter desserts in various places. You can search for them online on cooking websites or blogs, check recipe books specifically dedicated to Easter treats, or even get creative and come up with your own versions based on the basic ideas.
Can these dessert recipes be customized for dietary restrictions or allergies?
Yes, these dessert recipes can be easily customized to accommodate dietary restrictions or allergies. For example, you can use gluten-free flour or substitutes for people with gluten intolerance, or opt for dairy-free alternatives for those who are lactose intolerant. Just make sure to carefully read the labels of the ingredients you use.
Are these Easter desserts a healthy option for kids?
While these Easter desserts may not be the healthiest option, they can be enjoyed as an occasional treat. You can make them a bit healthier by using organic ingredients, reducing the amount of sugar, or adding some nutritious elements such as fresh fruit decorations or whole grain flour.