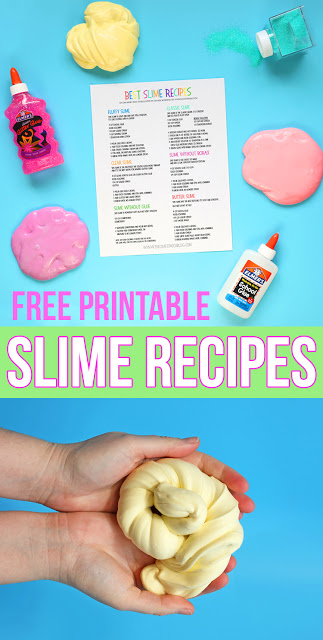
In our quest for creative and captivating activities, we often stumble upon fascinating trends that captivate our imagination. Today, we delve into the marvelous world of making mesmerizing slime from scratch – without the need for glue! This step-by-step guide will walk you through the secrets of concocting a glue-free slime recipe that will provide endless hours of entertainment for both children and adults alike.
Imagine a world where you can create your very own slime with ease, using readily available ingredients found in your pantry. This innovative recipe replaces the conventional use of glue with a mixture that is not only safe and easy to handle, but also boasts a delightfully gooey and stretchy texture that will leave you in awe. Get ready to embrace your inner scientist and embark on a thrilling adventure of DIY slime-making.
Revolutionize Your Health & Lifestyle!
Dive into the world of Ketogenic Diet. Learn how to lose weight effectively while enjoying your meals. It's not just a diet; it's a lifestyle change.
Learn MoreExperience the joy of transforming simple household items into a fascinating substance that oozes, squishes, and stretches. With just a few key ingredients, some stirring, and a touch of creativity, you can witness a mesmerizing chemical reaction that will result in a personalized slime masterpiece. By following this step-by-step guide, you’ll soon be able to create a variety of slime varieties, from glittery and vibrant colors to soothing and calming textures.
Are you ready to delve into the world of slime-making and unleash your imagination? Prepare to embark on a sensory journey that will challenge your scientific knowledge and ignite your creativity. Whether you’re looking for a fun weekend activity or a unique gift idea, this guide will provide you with the tools and instructions needed to create an enchanting experience that will entertain and amaze all who dare to explore the world of homemade slime.
- Detailed Guide on Making Glue-Free Slime at Home
- Ingredients
- Materials
- Get Creative with Homemade Slime
- Materials Needed
- Gather the Essentials for Glue-Free Slime
- Exploring Alternative Ingredients
- Step-by-Step Instructions
- Step 1: Prepare Your Workstation
- Step 2: Measure and Mix the Base Ingredients
- Step 3: Adding Color and Texture
- Step 4: Activating and Enhancing the Slime
- Questions and answers
Detailed Guide on Making Glue-Free Slime at Home
Discover the ultimate step-by-step tutorial for creating your very own glue-free slime right in the comfort of your own home. This comprehensive guide will walk you through the process of making a slime mixture without the need for glue, using simple ingredients that you may already have on hand. Follow these instructions and unleash your creativity by making a unique and satisfying slime concoction.
Ingredients
|
Materials
|
To begin the slime-making process, gather the necessary ingredients and materials. Instead of using traditional PVA glue, look for a suitable adhesive substitute that will provide the desired consistency. Prepare the glue alternative by combining it with water in a bowl, following the recommended ratios.
Next, add a borax substitute to the glue-water mixture. This ingredient will help create the slime’s unique texture. Gradually mix in small amounts of the borax substitute while continuously stirring the mixture. Keep adding and stirring until the desired consistency is achieved.
If you desire a personalized touch, now is the time to add food coloring or glitter to your slime mixture. Incorporate these optional additives and continue to stir until the color or sparkle is evenly distributed.
Once your slime is thoroughly blended, let it sit for a few minutes to allow the ingredients to fully combine. During this time, you may notice the slime becoming less sticky as it settles. After a short rest period, it’s time to engage your hands and play with the slime.
Enjoy the sensory experience of stretching, squeezing, and molding your homemade glue-free slime. Remember to store the slime in an airtight container when you’re not using it to maintain its desired consistency and prevent it from drying out.
Now that you have a detailed guide on creating glue-free slime, it’s time to unleash your creativity and explore the endless possibilities of this fun and satisfying DIY project. Have a blast experimenting with various colors, textures, and even scents to make your slime truly one-of-a-kind!
Get Creative with Homemade Slime
Unleash your imagination and explore the endless possibilities of homemade slime! Discover a world of tactile fun and entertainment as you experiment with different textures, colors, and add-ins. This section will inspire you to push the boundaries of creativity and personalize your slime creations like never before!
With a variety of ingredients at your disposal, you can transform your slime into a work of art. Add a dash of sparkle with glitter, create vibrant swirls with food coloring, or mix in small trinkets and beads to give your slime a unique touch. The choice is yours, and the options are as limitless as your imagination.
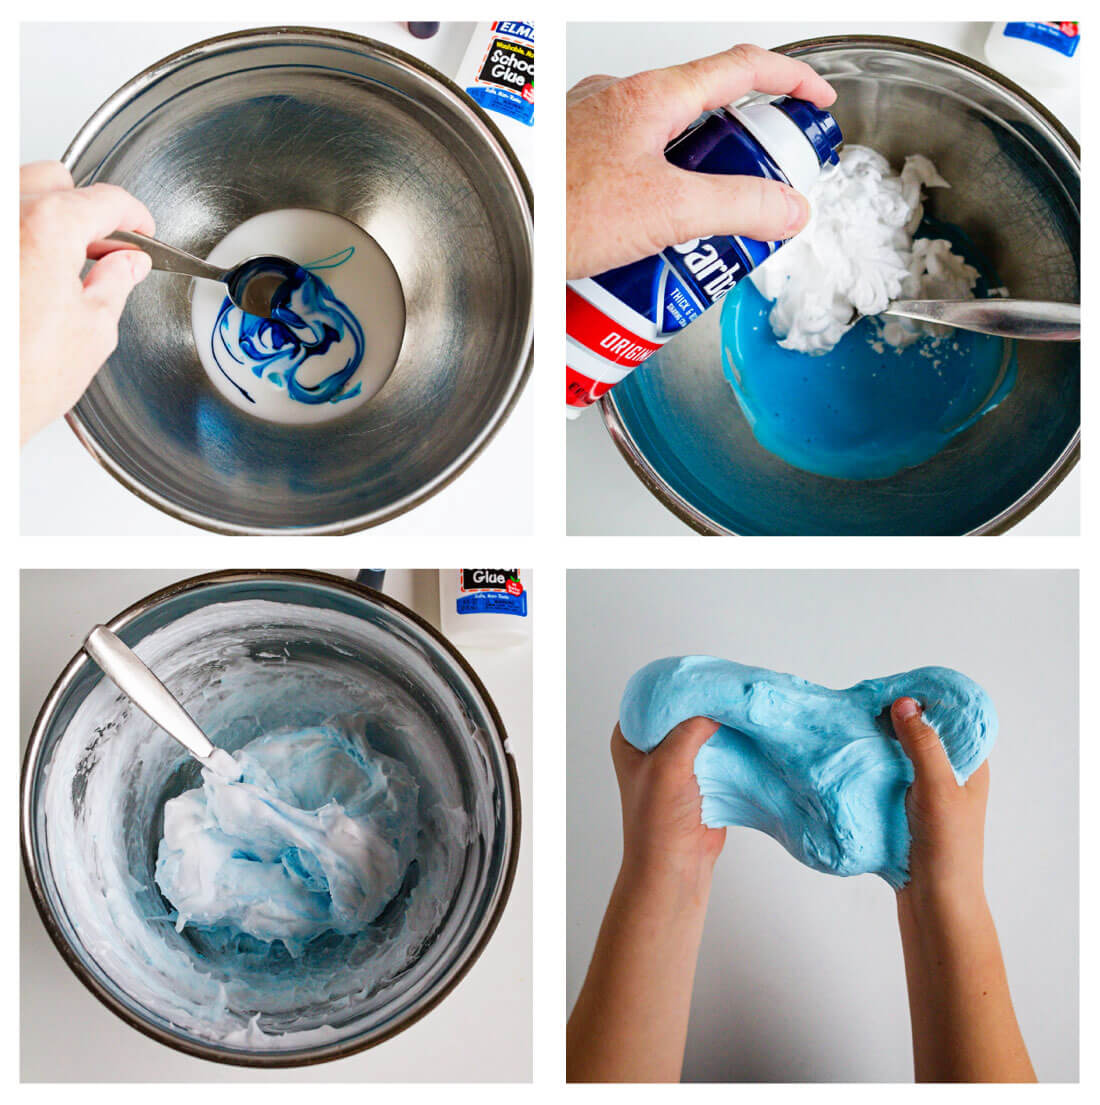
Texture is another dimension you can experiment with to elevate your slime. Mix in fluffy shaving foam for a cloud-like consistency, or incorporate foam beads for a satisfying crunch. You can even create a butter slime by adding clay, giving your slime a smooth and moldable feel. Feel free to try different combinations until you find the perfect texture that brings you joy.
Embrace the fun of sensory play by stretching, squishing, and squeezing your homemade slime. Engage your senses and let the slimy goodness provide a relaxing and therapeutic experience. The possibilities for creativity are boundless when it comes to homemade slime!
Don’t forget to experiment with scents to enhance your slime experience. Add a few drops of essential oils or fragrance oils to create a delightful aroma. Let the scent take you on a sensory journey as you dive your hands into the squishy slime.
Get ready to unleash your inner artist and create mesmerizing designs with homemade slime. Use various techniques like marbling, layering, or swirling to produce stunning visual effects. Show off your creations to friends and family, or start a slime art collection that reflects your unique style.
In this section, we will provide you with step-by-step instructions and inspiration to help you get started on your creative slime-making journey. Get ready to have hours of fun and unlock your imagination with homemade slime like never before!
Materials Needed
In order to create your own slime without using glue, there are several essential items you will need to gather. These materials are key to achieving a texture and consistency that is both satisfying and gooey.
Binder
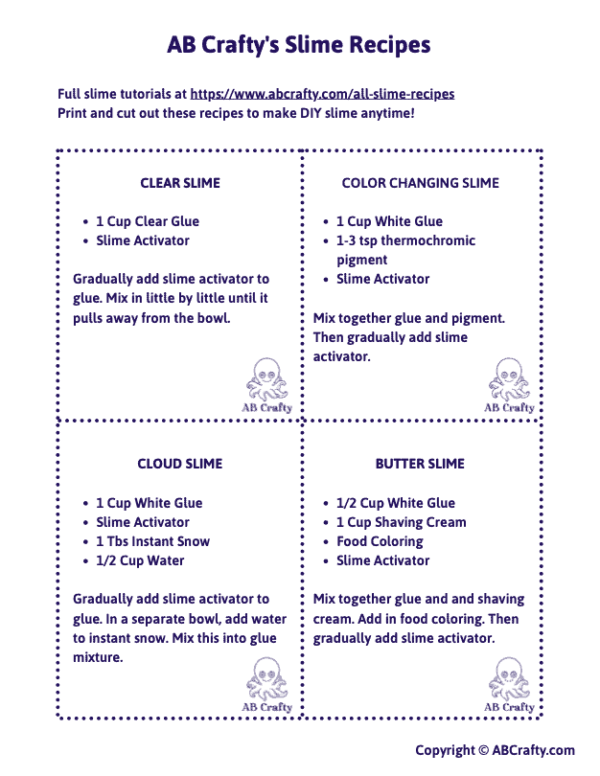
An important component for creating glue-free slime is a binder, which helps hold the ingredients together. Common binders include cornstarch, liquid starch, or clear glue substitute.
Activator
To ensure that your slime has the right consistency, you will need an activator. This ingredient is responsible for transforming the mixture and making it less sticky. Some popular activators include saline solution, borax, or baking soda mixed with contact lens solution.
Colorants
For a visually appealing slime, adding colorants is a must. Choose from a wide range of options such as food coloring, paint, or even eyeshadow. These additives will give your slime a vibrant and personalized touch.
Texture Enhancers
To create a unique sensory experience, consider using texture enhancers. These elements will change the feel of your slime, making it smoother, stretchier, or even crunchy. You can experiment with ingredients like foam beads, glitter, or lotion to achieve different effects.
Fragrance
Add an extra element of enjoyment to your slime by incorporating a pleasant fragrance. Essential oils, extracts, or scented glitters can be used to infuse your slime with a delightful scent.
Container
A suitable container is necessary to store your slime and keep it fresh. Opt for an airtight container that can be easily sealed and reused for multiple slime projects.
Measuring Tools
Accurate measurements are crucial when creating slime. Ensure you have measuring spoons, cups, or scales on hand to precisely measure each ingredient according to the specified quantities in the recipe.
By gathering these materials, you will be well-equipped to embark on your glue-free slime-making adventure. Let your creativity flow as you combine these ingredients and discover the perfect recipe for your desired slime consistency and sensory experience.
Gather the Essentials for Glue-Free Slime
When it comes to creating your own sticky and stretchy concoction, the first step is to gather all the necessary ingredients and tools. In this section, we will outline the essential items needed to make a glue-free slime that is sure to provide hours of entertainment.
| 1. Base Ingredient: | A substance that will serve as the main component of your slime. This could include alternatives to traditional glue, such as liquid starch, cornstarch, or even clear shampoo. |
| 2. Activator: | A solution or substance that will react with the base ingredient to create the desired texture. This can be items like borax powder, contact lens solution, or baking soda mixed with water. |
| 3. Coloring: | A variety of options to add color to your slime. Consider using food coloring, acrylic paints, or even natural dyes, like beet juice or turmeric. |
| 4. Mixing Tools: | Various utensils that will aid in the creation and manipulation of your slime. These can include spoons, spatulas, or even your hands for kneading and mixing. |
| 5. Containers: | Storage containers to keep your slime fresh and prevent it from drying out. Glass jars or plastic containers with tight lids work best for this purpose. |
| 6. Optional Additions: | Additional ingredients that can be added to enhance the texture or fragrance of your slime. This may include glitter, foam beads, essential oils, or even small toys for added fun. |
Now that you have a clear understanding of the essentials needed for glue-free slime, you are ready to embark on your DIY slime-making adventure. Gather these items and get ready to create a sensory experience like no other!
Exploring Alternative Ingredients
When it comes to creating your own slime, there are countless alternative ingredients that can be used in place of traditional glue. Experimenting with different ingredients can not only yield unique textures and colors, but also provide a glue-free option for those who may have sensitivities or allergies.
One alternative ingredient that many DIY slime enthusiasts have turned to is cornstarch. Cornstarch can create a thick and stretchy slime, perfect for those looking for a softer and more malleable consistency. Additionally, cornstarch can be easily colored and scented, allowing for even more creative possibilities.
Baking soda is another ingredient that can be used to achieve a glue-free slime. When mixed with water and a small amount of contact lens solution, baking soda creates a slimy texture that is both fun to play with and easy to clean up. This alternative is great for those who prefer a less sticky slime.
For those looking to create a slime with a completely different texture, liquid starch may be the solution. Liquid starch can produce a slime that is more gooey and jelly-like, making it a unique sensory experience. It is important to note that liquid starch can be a bit harder to find in stores, but it can easily be purchased online.
Other alternative ingredients that can be explored include hair gel, body wash, and even fiber powder. Each of these ingredients brings its own unique properties to the slime-making process, allowing for endless experimentation and creativity.
With all of these alternative ingredients at your disposal, there is no limit to the types of slime you can create. So, don’t be afraid to step outside of the traditional glue-based recipes and explore the world of alternative ingredients – you may just discover a new favorite slime recipe!
Step-by-Step Instructions
Follow these clear and concise instructions to create your very own homemade slime without the need for glue. This step-by-step guide will guide you through the process of making a fun and squishy substance that you can enjoy.
Start off by gathering all the necessary ingredients for your slime mixture. Make sure you have all the various components ready before you begin, as this will make the process smoother and more efficient. It’s important to have everything prepared in advance to avoid any unnecessary delays.
Once you have all your ingredients ready, it’s time to begin the creation process. Mix the chosen base material with the appropriate amount of activator, carefully following the recommended measurements. It’s crucial to use precise measurements to ensure the right consistency and texture of your slime.
After thoroughly mixing the base material and activator, you can now add any desired colors or textures to personalize your slime. Get creative and experiment with different combinations and amounts to achieve the desired look and feel. Don’t be afraid to let your imagination run wild!
Once you have achieved your desired slime mixture, it’s time to knead and stretch it to enhance its squishy and satisfying texture. Spend some time playing with your slime, molding it into various shapes and sizes. Explore the unique tactile experience that homemade slime provides.
Finally, store your homemade slime in an airtight container to maintain its freshness and longevity. This will ensure that you can continue to enjoy your DIY creation for days and even weeks to come. Remember to properly seal the container to prevent any unwanted drying or hardening of the slime.
Now that you have completed these step-by-step instructions, you are ready to embark on your slime-making adventure. Enjoy the process, have fun, and revel in the joy of creating your very own glue-free slime!
Step 1: Prepare Your Workstation
Before you dive into the exciting world of creating your own slime masterpiece, it’s important to prepare your workstation properly. This step sets the foundation for a successful slime-making experience.
Firstly, find a clean and flat surface to work on. You’ll want to have plenty of room to maneuver and mix your ingredients without any hindrances. It’s also a good idea to cover the surface with a plastic tablecloth or newspaper to protect it from any potential mess.
Next, gather all the necessary materials and ingredients. This may include a mixing bowl, measuring cups or spoons, a spatula or spoon for stirring, and any additional items such as food coloring or glitter that you may want to add to your slime. Keeping everything within easy reach will make the process much smoother.
Ensure that you have a comfortable and well-lit workspace. Good lighting is essential for accurately measuring and mixing your ingredients. Additionally, consider wearing protective gloves or an apron to keep your hands and clothes clean.
Lastly, it’s important to have a clear understanding of the recipe you’ll be following and the steps involved. Familiarize yourself with the instructions before starting, and if necessary, have them readily accessible during the process. This will help you stay organized and ensure that you don’t miss any crucial steps.
By taking the time to properly prepare your workstation, you’ll set yourself up for a smooth and enjoyable slime-making experience. So, roll up your sleeves, gather your materials, and get ready to embark on your slime-making journey!
Step 2: Measure and Mix the Base Ingredients
In this step, we will focus on the crucial task of measuring and mixing the essential components that form the foundation of our slime mixture. Paying attention to the right proportions and carefully combining these elements will ensure the desired consistency and texture of your slime creation.
Firstly, gather all the necessary base ingredients. These components, when combined, will give your slime its unique properties and characteristics. Measure out each ingredient with precision and accuracy, as even a slight variation in amounts can impact the final outcome.
Binding Agent: Choose a suitable binding agent that will serve as the main component for holding the slime together. This can be achieved by using various alternatives to traditional glue, such as cornstarch, liquid laundry detergent, or even toothpaste. Experiment with different options to find the one that works best for your slime recipe.
Activator: The activator plays a vital role in transforming the binding agent into a slimy consistency. Common activators include contact lens solution, borax solution, or even a mixture of water and baking soda. Remember to add the activator gradually, mixing it into the binding agent until the desired texture is achieved.
Additives: To enhance the visual appeal and sensory experience of your slime, consider incorporating various additives. These can include glitter, food coloring, or small decorative items such as beads or foam balls. Add these ingredients sparingly, keeping in mind that excessive amounts can affect the desired consistency of your slime.
Note: It is important to exercise caution and practice good safety measures when handling and mixing the base ingredients. Follow any specific instructions provided by the chosen alternatives to traditional glue or activators, and avoid contact with eyes or ingestion of the mixture.
By carefully measuring and expertly mixing the base ingredients, you are one step closer to creating your perfect glue-free slime. Proceed to the next step to learn how to add the finishing touches and personalize your slime creation with unique textures and scents.
Step 3: Adding Color and Texture
Now that you have successfully combined the necessary ingredients and achieved the desired slime consistency, it’s time to take your slime-making experience to the next level by adding color and texture. This step allows you to unleash your creativity and customize your slime according to your preferences.
When it comes to coloring your slime, the options are limitless. You can choose from a wide range of food coloring, acrylic paint, or even glitter. Adding color gives your slime a vibrant and eye-catching appearance, making it even more enjoyable to play with. Experiment with different color combinations to create a unique and personalized slime.
In addition to color, you can also enhance the texture of your slime. One way to do this is by incorporating various add-ins such as foam beads, sequins, or confetti. These additions create a sensory experience, adding a satisfying crunch or a touch of sparkle to your slime. Get adventurous and try different textures to make your slime even more engaging.
When adding color and texture to your slime, it’s essential to start with small amounts and gradually mix them in. This allows you to control the intensity of the color and texture, ensuring that you achieve the desired effect. Remember, you can always add more, but it’s challenging to remove excess color or texture once it’s incorporated.
Once you’ve added your chosen color and texture, thoroughly mix them into the slime until they are evenly distributed. Take your time and ensure that everything is well blended to create a cohesive slime. Keep in mind that some textures, like foam beads, may require extra kneading or mixing to fully incorporate.
With the addition of color and texture, your slime transformation is complete. This final step adds a personal touch to your creation, making it uniquely yours. Embrace your artistic side, experiment with different colors and textures, and let your creativity shine through as you bring your slime to life.
Step 4: Activating and Enhancing the Slime
Once you have prepared your homemade slime mixture, it’s time to activate it and give it the perfect consistency and texture. This step will ensure that your slime is not only fun to play with but also durable and stretchy.
Activating the slime involves adding an activator ingredient that will bind the different elements together, creating a cohesive and stretchable mixture. There are various options available for activating your slime, depending on your preference and availability of ingredients. These activators can include contact lens solution, liquid starch, or borax solution.
It is important to follow the instructions provided by the specific activator you choose, as different activating agents may require varying amounts to achieve the desired consistency. Start by adding a small amount of the chosen activator to the slime mixture and gradually mix it in. You can add more if needed, but be cautious not to add too much, as it may cause the slime to become stiff or rubbery.
| Activator | Description | Usage |
|---|---|---|
| Contact Lens Solution | A solution typically used for cleaning and disinfecting contact lenses. | Add a few drops at a time while mixing until desired consistency is reached. |
| Liquid Starch | A laundry product that contains chemicals to bind fabrics together. | Pour small amounts into the slime mixture and gradually mix until desired consistency is achieved. |
| Borax Solution | A mixture of borax powder and water, often used for various household cleaning purposes. | Add a small amount of the solution to the slime mixture and mix well. Adjust as needed. |
Once you have added the activator and mixed it thoroughly with the slime, it’s time to perfect your creation. Play with the slime, stretch it, and knead it to ensure that it has the desired elasticity and texture. If the slime feels too sticky, you can add a small amount of baby oil or lotion to your hands and continue kneading until it reaches the desired consistency.
Remember, the process of activating and perfecting the slime may require some experimentation and adjustments to achieve the ideal result. Enjoy the creative process and have fun with your custom-made, glue-free slime!
Questions and answers
What materials do I need to make glue-free slime?
To make glue-free slime, you will need cornstarch, liquid dish soap, food coloring (optional), and a bowl for mixing.
Can I use any type of cornstarch for the slime recipe?
Yes, you can use any type of cornstarch for the slime recipe. It does not matter if it is organic or not. Just make sure it is cornstarch and not cornflour.
Is it safe to make glue-free slime without adult supervision?
It is generally safe to make glue-free slime without adult supervision. However, it’s always a good idea to have an adult nearby in case you need assistance or if any accidents occur.
Are there any alternative ingredients I can use if I don’t have liquid dish soap?
If you don’t have liquid dish soap, you can use liquid hand soap or body wash as an alternative. Just make sure it is clear and not creamy or containing lotion.
How long does the glue-free slime last?
The duration of the glue-free slime depends on how it is stored and used. If kept in an airtight container and not exposed to excessive moisture, it can last for several weeks. However, if it starts to smell or change in texture, it is best to discard it.
What ingredients do I need to make glue-free slime?
To make glue-free slime, you will need clear liquid dish soap, baking soda, and saline solution. These ingredients can be easily found at your local grocery store.
Can I use any kind of dish soap to make the glue-free slime?
No, it is important to use clear liquid dish soap for this slime recipe. Other types of dish soap may not work well and may not give you the desired consistency.
Can I substitute the saline solution with something else?
If you don’t have saline solution on hand, you can use contact lens solution that contains boric acid. Make sure to check the ingredients before using it. However, do not use water as a substitute as it will not give you the same results.
Is the slime recipe safe for children?
Yes, this glue-free slime recipe is safe for children to play with. However, it is always recommended to supervise young children while they are playing with slime and ensure they do not ingest it. If any allergies or sensitivities are present, it is important to avoid using the ingredients that may trigger them.
How can I store the slime for later use?
To store the slime, place it in an airtight container or a ziplock bag. Make sure to remove any air bubbles before sealing it. Store it in a cool and dry place, away from direct sunlight. With proper storage, the slime can last for several weeks.