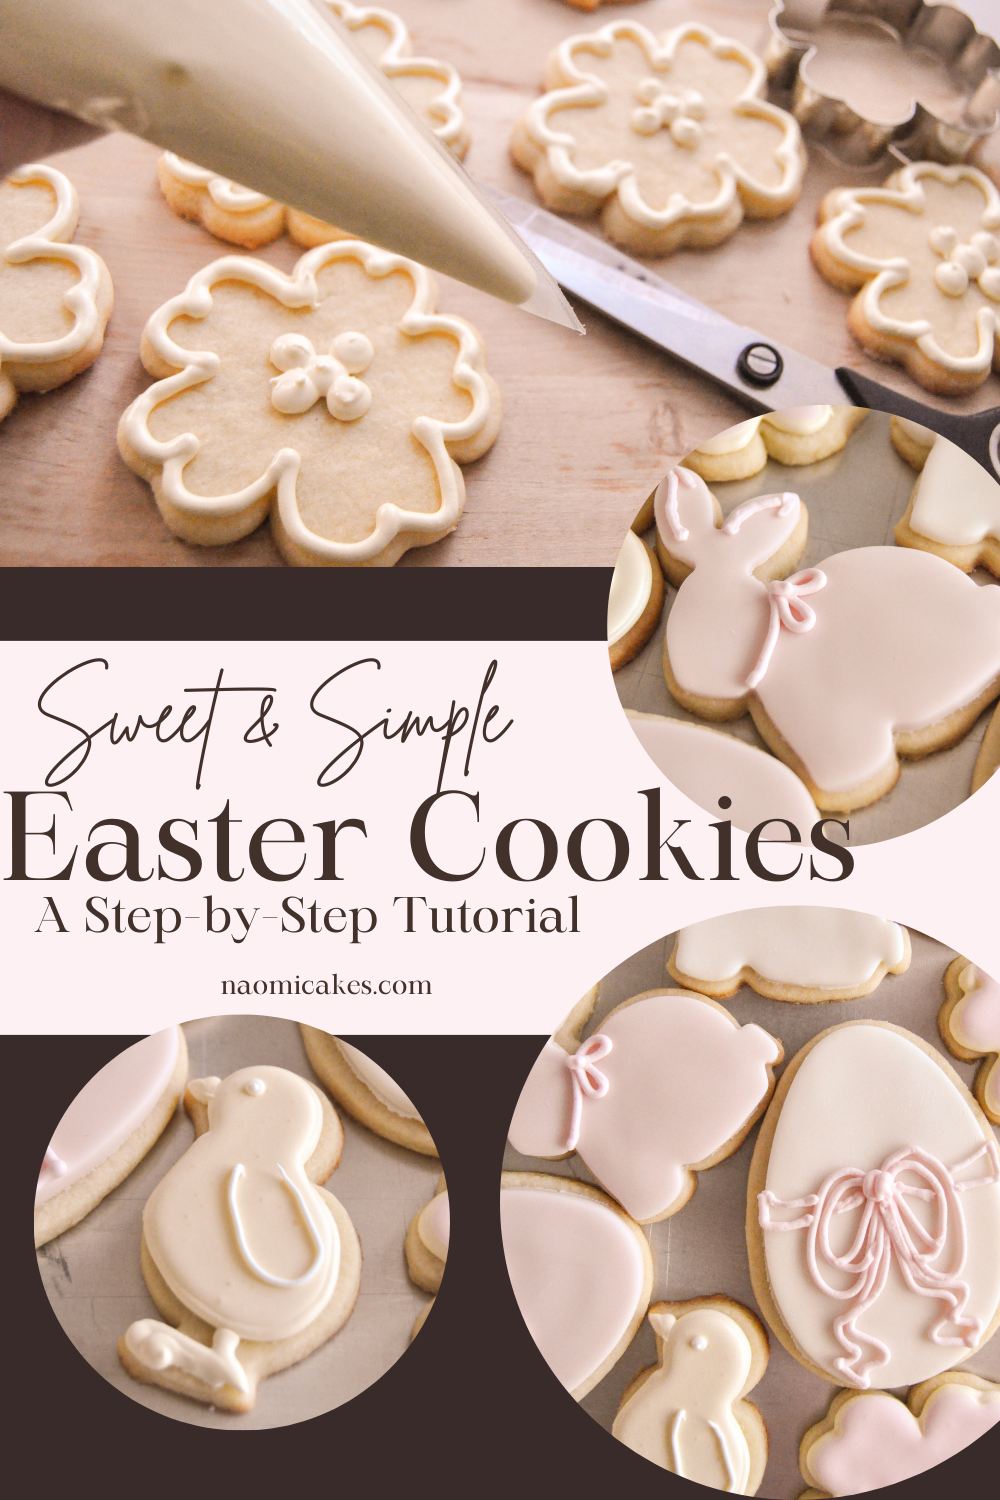
Spring is in the air, and with it comes the delightful celebration of Easter. As we gather with family and friends to mark this joyous occasion, there is no better way to embrace the festive spirit than by indulging in some delicious homemade treats. And what better way to showcase your creativity and culinary skills than by decorating Easter cookies like a true artisan?
With our step-by-step instructions, you will embark on a journey of transforming plain cookies into edible works of art. By mastering the art of cookie decorating, you will not only impress your loved ones but also unleash your inner artist. From intricately piped designs to vibrant colors that capture the essence of spring, the possibilities are endless.
At first glance, the process may seem daunting, and you may wonder if you have the skills to achieve professional-looking results. But fear not, as our comprehensive tutorial will guide you through every aspect of the decorating process. Armed with patience, a steady hand, and a few essential tools, you will soon find yourself adorning your Easter cookies with confidence and finesse.
Get ready to dive into a world of creativity and indulge in the art of cookie decorating. Whether you are a novice or a seasoned baker, our guide will provide you with valuable tips and techniques that will take your cookie decorating skills to the next level. So gather your supplies, unleash your imagination, and get ready to create Easter cookies that will leave everyone in awe.
Gather Your Supplies and Prepare the Cookies

Before you embark on your Easter cookie decorating adventure, it’s important to gather all the necessary supplies and prepare your cookies for decorating. This section will guide you through the essential items you’ll need and the steps to ensure that your cookies are ready for the creative process.
- Cookie Ingredients: Start by preparing a batch of sugar cookie dough or any other cookie recipe of your choice. Gather the ingredients needed for the dough and follow the recipe instructions to create delicious and perfectly textured cookies.
- Cookie Cutters: Find a variety of Easter-themed cookie cutters, such as bunnies, eggs, flowers, and chicks. These shapes will form the base for your decorated cookies. Make sure your cookie cutters are clean and ready to be used.
- Baking Supplies: You’ll need baking sheets, parchment paper, and cooling racks to bake and cool your cookies. Line the baking sheets with parchment paper to prevent sticking, and have the cooling racks ready to transfer the cookies once they’re done baking.
- Icing and Decorating Supplies: Prepare different colors of royal icing or buttercream frosting for decorating your cookies. Gather piping bags, small icing tips, toothpicks, food coloring, sprinkles, and any other edible decorations you plan to use. Organize these supplies in containers or separate bowls for easy access during the decorating process.
- Tools: Don’t forget to have the necessary tools on hand. A rolling pin for rolling out the cookie dough, a spatula for transferring the cut-out cookies onto the baking sheets, and a small offset spatula or a butter knife for spreading the frosting onto the cookies.
Now that you have all your supplies ready, it’s time to prepare the cookies for decorating. Follow these steps:
- First, preheat your oven to the recommended temperature mentioned in your cookie recipe.
- Lightly flour your work surface and roll out the cookie dough to the desired thickness. Use your Easter-themed cookie cutters to cut out shapes from the dough.
- Transfer the cut-out cookies onto the prepared baking sheets, spacing them apart to allow for spreading during baking.
- Bake the cookies according to the recipe instructions, making sure to keep a close eye on them to prevent overbaking. Once the edges turn golden brown, remove the cookies from the oven and let them cool on the racks completely before decorating.
By gathering all the necessary supplies and adequately preparing your cookies, you’re setting yourself up for a successful and enjoyable Easter cookie decorating experience. Now that the cookies are ready, it’s time to unleash your creativity and turn them into beautifully decorated treats!
Choose Your Cookie Recipe

In this section, we will explore the various options for selecting the perfect cookie recipe to create beautifully decorated Easter treats. Whichever recipe you choose, be prepared to delight your taste buds with a symphony of flavors, textures, and aromas.
Now, let’s dive into the exciting world of cookie baking. Whether you prefer classic sugar cookies, rich chocolate delights, or buttery shortbread treats, there is a recipe that will suit your preferences. The choice of cookie recipe will set the foundation for your upcoming decorating adventure.
For those who appreciate simplicity, the classic sugar cookie recipe will never fail to impress. These versatile cookies provide a blank canvas that allows your artistic skills to shine. The dough can be rolled out and cut into various shapes, making them perfect for Easter-themed decorations.
If you are a chocolate lover, consider opting for a rich and fudgy chocolate cookie recipe. These indulgent treats will add a decadent touch to your Easter cookie display. Enhance their appeal by adding colorful icing and decorations, and watch them disappear in no time.
If you prefer a buttery and crumbly texture, then shortbread cookies are the way to go. With their melt-in-your-mouth goodness, shortbread cookies serve as a sophisticated base for intricate designs. The simplicity of their ingredients allows the flavors of the decorations to take center stage.
Once you have selected your cookie recipe, gather the ingredients, roll up your sleeves, and get ready to embark on a journey of creativity and deliciousness. Remember, no matter which recipe you choose, the key is to have fun throughout the process and enjoy the sweet rewards at the end.
Assemble Your Decorating Tools
Preparing to decorate your Easter cookies like a professional requires gathering all the necessary tools and equipment. Having the right set of tools at your disposal will make the decorating process easier and more enjoyable. Ensuring you have a well-prepared decorating station will set the stage for creating beautifully adorned Easter cookies.
Begin by obtaining a variety of piping bags and tips to achieve different designs and patterns on your cookies. These tools will allow you to create intricate details and precise outlines on your Easter-themed treats. Consider investing in a set with different nozzle sizes to add depth and dimension to your designs.
Next, gather an assortment of food coloring gels or liquid dyes to add vivid and vibrant hues to your cookies. Using a range of colors will help bring your Easter designs to life and add visual appeal to your creations. Make sure to choose food-safe coloring options that are suitable for use with edible decorations.
In addition to piping bags and coloring gels, having a reliable offset spatula is essential for smooth cookie icing application. This tool will enable you to evenly spread icing on your cookies, creating a clean and polished look. Look for a spatula with a comfortable grip and a wide blade to make the process more efficient.
To add finer details and intricate designs to your Easter cookies, consider using specialty tools like stencils, embossing mats, or even toothpicks. These tools can help you achieve precise patterns, textures, and even create images on your cookies. Experiment with different designs and techniques to unleash your creativity and make your Easter cookies truly unique.
Lastly, don’t forget to gather essential cleaning supplies such as damp paper towels or kitchen wipes to wipe off any excess icing or coloring from your tools. Keeping your workspace clean and tidy throughout the decorating process will ensure optimal results and less time spent on cleanup afterwards.
By gathering and organizing your decorating tools beforehand, you’ll be equipped with everything you need to create stunning Easter cookies. Having the right tools and materials at hand will make the decorating process smoother, allowing you to focus on unleashing your creativity and achieving professional-looking results.
Bake and Cool the Cookies
Preparing delicious Easter cookies is a delightful experience that begins with baking and cooling the cookies to perfection. This crucial step ensures that the cookies are evenly cooked and ready for the next stage of decoration.
To start, preheat your oven to the recommended temperature specified in your cookie recipe. Gather your high-quality ingredients, measure them accurately, and mix them together following the instructions. Once the cookie dough is ready, shape it into desired shapes using cookie cutters or by hand.
Place the shaped dough onto a baking sheet lined with parchment paper or a silicone mat. Make sure to leave enough space between each cookie to allow for slight spreading during baking. This will help prevent the cookies from sticking together or becoming misshapen.
Next, carefully transfer the baking sheet into the preheated oven. Allow the cookies to bake for the specified time, keeping a close eye on them to prevent over-browning. Every oven is different, so it’s essential to follow the suggested baking time mentioned in the recipe or keep a watchful eye for signs of doneness.
Once the cookies have reached a golden-brown color and are set, remove them from the oven using oven mitts or a heat-resistant spatula. Transfer the cookies onto a wire rack to cool completely. Cooling is an essential part of the process as it allows the cookies to firm up and become easier to handle during the decoration process.
Patience is key during the cooling process, as rushing this step may result in cookies that are too fragile or prone to breakage. Allow the cookies to cool for the recommended time in the recipe or until they are completely cooled to the touch. This will ensure that they are ready for the next step of decorating them like a pro.
By properly baking and cooling your Easter cookies, you set a solid foundation for creating beautifully decorated treats that will impress both family and friends.
Create a Beautiful Base Coat

In this section, we will explore the art of creating a stunning foundation for your Easter cookies. Building upon a carefully crafted canvas is essential to achieve professional-looking results. By mastering the technique of applying a flawless base coat, you will be able to enhance the overall appearance of your cookies and elevate them to a whole new level.
Preparing the Royal Icing
In this section, we will discuss how to prepare the royal icing, a versatile and essential component in decorating Easter cookies. The royal icing is a smooth and glossy icing that can be used to create intricate designs and add beautiful finishes to your cookies. It is made using simple ingredients such as powdered sugar, egg whites, and lemon juice, and can be easily customized with various flavors and colors.
To prepare the royal icing, you will need to start by sifting the powdered sugar to ensure a smooth texture. Then, in a mixing bowl, whisk together the sifted powdered sugar, egg whites, and a few drops of lemon juice. The lemon juice helps to stabilize the icing and adds a subtle tangy flavor. Gradually mix in the additional lemon juice or water to achieve the desired consistency. For detailed designs, a thicker icing is recommended, while a thinner consistency is ideal for flooding or covering larger areas.
Once the royal icing is prepared, you can add food coloring or flavorings to enhance its appearance and taste. Gel or powdered food coloring works best as it doesn’t alter the consistency of the icing. It is important to note that a little goes a long way, so it’s better to start with a small amount and gradually add more until the desired color is achieved. Similarly, adding a few drops of vanilla, almond extract, or other flavorings can elevate the taste of the icing.
To prevent the royal icing from drying out, cover the bowl with a damp cloth or plastic wrap. If you want to store the icing for later use, transfer it to an airtight container and keep it in the refrigerator. Before using the icing, make sure to bring it back to room temperature and give it a good stir to ensure a smooth consistency.
| Ingredients: | Instructions: |
|---|---|
| – Powdered sugar | 1. Start by sifting the powdered sugar to remove any lumps. |
| – Egg whites | 2. In a mixing bowl, whisk together the sifted powdered sugar and egg whites. |
| – Lemon juice | 3. Add a few drops of lemon juice for stability and flavor. |
| – Food coloring/flavorings | 4. Customize the icing with food coloring or flavorings, adding gradually until desired color/taste is achieved. |
Add Gel Food Coloring for Vibrant Colors
Enhance the visual appeal of your Easter cookies with the addition of gel food coloring. By incorporating this vibrant coloring agent into your cookie decorating process, you can achieve eye-catching and professional-looking results.
Unlike traditional liquid food coloring, gel food coloring offers a more concentrated and intense color payoff. Its thicker consistency allows for better control over the amount of color you add to your icing or cookie dough, preventing it from becoming too runny or diluted.
- Start by selecting a variety of gel food coloring shades that complement your desired Easter cookie design. Consider using a combination of pastel hues and bolder, more vivid colors to create contrasting elements.
- When working with gel food coloring, begin with a small amount and gradually add more as needed. Remember, it’s easier to darken a color than to lighten it, so start with caution.
- For accurately measuring small amounts of gel food coloring, use toothpicks or a clean, disposable tool. Dip the toothpick into the gel color and transfer it to your icing or dough, repeating until you achieve the desired shade.
- To avoid cross-contamination of colors, always use separate toothpicks or utensils for each gel food coloring shade. This will help maintain the purity of each color and prevent unwanted mixing.
- Experiment with different application techniques, such as marbling or creating intricate patterns, by blending multiple gel food coloring shades together. This will add depth and dimension to your Easter cookie decorations.
- Remember that gel food coloring may take some time to fully develop its true color, especially in icing or dough. Allow the cookies to sit for a few hours or overnight for the colors to intensify before making any adjustments.
By utilizing gel food coloring in your Easter cookie decorating process, you can achieve vibrant and visually appealing results that will impress your family and friends. Experiment with different colors and techniques to create truly professional-looking treats.
Questions and answers
What kind of cookies can I use for Easter decorations?
You can use sugar cookies or shortbread cookies as they work best for decorating.
Do I need any special tools to decorate Easter cookies?
While it’s not necessary, having cookie cutters, icing bags, and various decorating tips can make the process easier and give you more options for designs.
How do I make royal icing for Easter cookie decorations?
To make royal icing, you’ll need egg whites, confectioners’ sugar, and a touch of lemon juice. Beat the egg whites until frothy, gradually add the confectioners’ sugar and lemon juice, and continue beating until stiff peaks form.
What are some popular designs for Easter cookies?
Common designs for Easter cookies include bunnies, chicks, eggs, flowers, and crosses. You can also get creative and customize your designs based on your preferences.
How can I store decorated Easter cookies?
To keep the decorations intact, store the cookies in an airtight container at room temperature. Layer the cookies with parchment or wax paper to prevent them from sticking together.
What techniques can I learn to decorate Easter cookies like a professional?
You can learn techniques like flooding, piping, and using royal icing to decorate Easter cookies like a pro.
Is it necessary to use royal icing for decorating Easter cookies?
Using royal icing is not necessary, but it provides a smooth and professional finish to your Easter cookies.
What tools and materials do I need to decorate Easter cookies?
You will need cookie cutters, rolling pin, piping bags, different sizes of tips, food coloring, sprinkles, and royal icing to decorate Easter cookies.
Can I make my own customized designs for Easter cookies decorations?
Absolutely! You can create your own designs or find inspiration from various sources like cookbooks, online tutorials, or even drawing sketches.
How long does it take to decorate Easter cookies?
The time required to decorate Easter cookies varies depending on the intricacy of the design and your level of experience. It can take anywhere from a few minutes to a few hours.