
Spring is in the air, and what better way to celebrate than by jazzing up your nails with some festive Easter-themed designs? Whether you’re a nail art pro or just starting out, these creative ideas will have you ready for the holiday in no time.
Get ready to embrace your inner artist as we explore a variety of fun and playful nail designs that will make your fingertips stand out during your Easter celebrations. From adorable bunnies and colorful eggs to delicate flowers and pastel patterns, there’s something for everyone to try.
With just a few simple tools and a little bit of patience, you can achieve professional-looking results right at home. Don’t be afraid to experiment with different colors, shapes, and techniques – the possibilities are endless! Whether you prefer a subtle and elegant look or want to go all out with vibrant and bold designs, you’ll find plenty of inspiration here to suit your style.
So why not treat yourself to an Easter-themed manicure and let your nails become the ultimate accessory this holiday season? Gather your nail polish collection, grab some nail art brushes or toothpicks, and get ready to create some egg-cellent designs that will impress your friends and family. Let’s dive into the world of DIY Easter nail art and unleash your creativity!
Get Inspired by Spring

The spring season is a perfect time to embrace the beauty of nature and let it inspire your creativity. With the vibrant colors, blooming flowers, and refreshing scents, there are endless possibilities to create stunning nail art designs. In this section, we will explore different ways to incorporate the essence of spring into your nail art, allowing you to express your personality and showcase your artistic skills.
Start by drawing inspiration from the breathtaking spring landscapes. Think about the pastel shades that dominate this season, such as soft pinks, light blues, and delicate yellows. These colors not only symbolize new beginnings but also add a touch of elegance and femininity to your nail art designs. Experiment with different shades and combinations to create unique patterns and gradients that reflect the beauty of spring.
Another way to get inspired by spring is to take a closer look at the flora and fauna that come to life during this season. From cherry blossoms to daffodils, there are numerous flowers that can be incorporated into your nail art. Consider using floral patterns, either hand-painted or with the help of stickers or decals, to add a touch of nature to your nails. You can also experiment with different textures, such as using dried flowers or glitter, to create a three-dimensional effect.
Spring is also a time for cute and playful creatures, such as butterflies, ladybugs, and bumblebees, to make their appearances. Embrace the whimsical side of spring by incorporating these adorable creatures into your nail art designs. You can either paint them directly onto your nails or use nail wraps or stickers for a more detailed look. The vibrant colors and intricate patterns of these creatures will instantly add a touch of charm to your manicure.
- Experiment with different nail shapes and lengths to create unique spring-inspired looks. Try almond-shaped nails for a feminine touch or square-shaped nails for a modern twist.
- Consider adding some sparkle to your spring nail art with the help of rhinestones, sequins, or glitter. These elements will give your manicure a glamorous and eye-catching appeal.
- Don’t be afraid to mix and match patterns and colors to create personalized spring nail art designs. Play with polka dots, stripes, or geometric shapes to add a touch of fun and creativity.
- Lastly, don’t forget to finish off your spring-inspired nail art with a high-quality top coat to ensure its longevity and shine. This will keep your manicure looking fresh and vibrant throughout the entire season.
So, let the beauty of spring inspire your nail art creations and unleash your inner artist. Whether you prefer a subtle and elegant design or a bold and playful look, there are endless possibilities to explore. Embrace the essence of spring and let your nails bloom with creativity!
Embrace Pastel Colors
Discover the beauty and charm of pastel colors for your Easter nail art designs. Embrace the softness and delicacy that pastel shades bring, adding a touch of elegance and sophistication to your manicure. Explore a palette of muted hues inspired by nature’s blossoming flowers and the sweet pastels of Easter eggs. This section will guide you through different pastel color combinations and techniques to create stunning nail art that is sure to impress.
Incorporate Floral Designs
Enhance your Easter nail art with the delicate beauty of floral designs. Incorporating flowers into your nail art can add a touch of elegance and femininity to your overall look. There are numerous ways to incorporate floral designs into your Easter nail art, allowing you to express your creativity and personal style.
One way to incorporate floral designs is by using nail stamps or decals. These pre-designed stamps or decals feature various floral patterns that can be easily transferred onto your nails with the help of a stamper or tweezers. Choose designs that complement your overall nail art and experiment with different color combinations to create stunning floral patterns.
If you prefer a more freehand approach, you can try painting flowers directly onto your nails using nail polish and a fine brush. Start by painting a base color on your nails and then use a contrasting color to create intricate flower petals. Add details such as leaves and stems to complete the floral design. This technique requires a steady hand and patience, but the end result is worth the effort.
Another way to incorporate floral designs is by using nail stickers or wraps. These adhesive designs come in a wide range of floral patterns and can be easily applied onto your nails. Simply peel off the sticker or wrap, apply it onto your nail, and smooth out any air bubbles. Finish with a top coat to seal in the design and ensure long-lasting wear.
If you’re feeling adventurous, you can also try creating 3D floral designs using acrylic or gel. This technique involves sculpting flowers, petals, and leaves using the chosen medium and then attaching them to your nails using nail glue. The result is a stunning and dimensional floral design that adds depth and texture to your Easter nail art.
Remember to experiment and have fun with floral designs for your Easter nail art. Whether you opt for stamps, decals, freehand painting, stickers, wraps, or 3D designs, incorporating floral elements will surely give your nails a vibrant and spring-inspired look.
Prep Your Nails
Before you start creating your beautiful Easter nail art, it’s important to properly prep your nails to ensure a long-lasting and flawless manicure. Taking the time to prepare your nails will not only help the nail polish adhere better, but it will also prevent chipping and peeling.
Here are some essential steps to follow in order to prep your nails:
- Start by removing any existing nail polish using an acetone-free nail polish remover. This will help get rid of any residue and oils on your nails.
- Next, trim and shape your nails to your desired length and shape using a nail clipper and a nail file. Choose a shape that suits your preference, whether it’s square, round, oval, or almond.
- Gently push back your cuticles using a cuticle pusher or a wooden stick. This will create a clean and neat canvas for your nail art.
- Once your cuticles are pushed back, you can use a cuticle trimmer to carefully remove any excess cuticle. Be cautious not to cut too much as it can cause pain and damage.
- Buff the surface of your nails with a nail buffer to smooth out any ridges or imperfections. This will provide a smooth base for your nail polish to adhere to.
- Finally, clean your nails with a gentle nail cleanser or rubbing alcohol to remove any remaining oils or debris.
By following these steps to prep your nails, you’ll create the perfect foundation for your DIY Easter nail art. Now you’re ready to move on to the fun part – designing and painting your Easter-inspired patterns and decorations!
Clean and Shape
Before creating intricate and eye-catching Easter nail art designs, it is important to start with a clean and well-shaped canvas. Properly preparing your nails will ensure that your artwork looks its best and lasts longer. Here are some essential steps to follow:
- Begin by removing any old nail polish using a gentle acetone-free nail polish remover. This will help to eliminate any residue or staining on the nails.
- Next, trim your nails to your desired length using a nail clipper. Be sure to choose a length that is practical for your everyday activities while still allowing space for your chosen nail art.
- Gently file the edges of your nails with a nail file to create a smooth and even shape. Choose from rounded, square, almond, or any other shape that suits your personal preference.
- Use a buffer to gently buff the surface of your nails. This will help to remove any ridges and create a smooth finish, providing a better base for your nail art.
- Carefully push back your cuticles using a cuticle pusher or an orangewood stick. This will give your nails a neat and clean appearance, making your nail art stand out.
- Finish the cleaning process by washing your hands with soap and water to remove any remaining debris or oils from your nails.
By starting with clean and well-shaped nails, you are setting yourself up for success when it comes to creating gorgeous Easter nail art. Taking the time to properly clean and shape your nails will not only make your artwork look more professional but also help it to last longer. Don’t rush this step and enjoy the therapeutic process of preparing your nails for the beautiful designs that await!
Apply a Base Coat
A crucial step in creating stunning DIY Easter nail art is to apply a base coat. This initial layer of color not only prepares your nails for the design, but also provides a smooth and even canvas for your creativity to shine.
The base coat acts as a foundation, ensuring that the nail polish adheres well to your nails and lasts longer. It also helps to protect your nails from staining and allows for easy removal of the nail art later on.
Before applying the base coat, make sure your nails are clean and properly prepped. File and shape your nails to your desired length and smooth any rough edges. Gently push back your cuticles with a cuticle stick or trim them if needed, taking care not to cut too close to the skin.
When selecting a base coat, choose a color that complements or enhances the nail art design you have in mind. Classic clear or nude shades are versatile options that work well with various Easter-themed patterns and colors.
Apply a thin and even layer of the base coat to each nail, starting from the center and moving towards the edges. Ensure that the entire nail is covered, including the tips, to promote longevity and prevent chipping.
Allow the base coat to dry completely before proceeding with the next steps of your Easter nail art creation. This will help to prevent smudging or smearing of the design.
By applying a well-prepared and carefully selected base coat, you set the stage for vibrant and long-lasting Easter nail art that will surely impress.
Easter Nail Art Designs
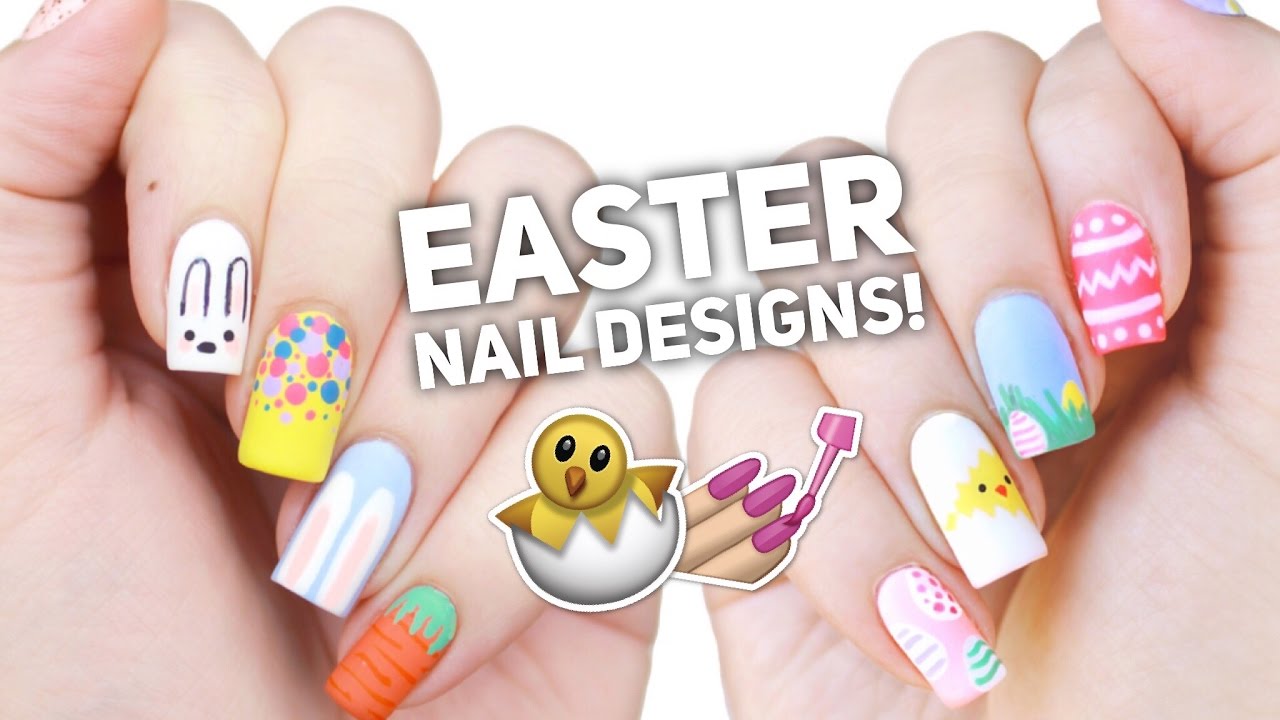
Discover the enchanting world of Easter nail art designs, where creativity and imagination come alive on your fingertips. From delicate pastel hues to vibrant patterns and whimsical motifs, these unique and eye-catching designs will make your nails the perfect accessory for the Easter season.
Embrace the spirit of Easter with elegant floral patterns that evoke the beauty of blooming spring gardens. Delicately painted petals and leaves in soft shades of pink, lavender, and mint create a harmonious and feminine look. Alternatively, opt for bold and vibrant floral designs for a statement-making manicure that captures the joy and celebration of Easter.
For a touch of whimsy, incorporate playful Easter symbols into your nail art designs. Adorn your nails with tiny bunnies, colorful Easter eggs, or adorable chicks to add a delightful element of fun. Whether you choose to paint these motifs freehand or use nail decals, they are sure to bring a smile to your face.
If you prefer a more minimalist approach, consider geometric patterns with a subtle Easter twist. Sleek lines, triangles, and dots in pastel shades can create a modern and sophisticated look that is perfect for those who appreciate understated elegance. Accentuate these patterns with hints of gold or silver for an added touch of glamour.
Experiment with textures and finishes to enhance your Easter nail art designs. Incorporate glitter, metallic accents, or matte top coats to add depth and interest to your manicure. Consider ombre effects or gradient designs using complementary pastel shades for a soft and romantic look.
Express your individuality and embrace the joy of Easter with these stunning nail art designs. Whether you prefer intricate detailing or simple yet impactful patterns, there is a design suited to your unique style and taste. Let your nails be a canvas for self-expression and creativity this Easter season.
Easter Bunny Nails
Using a combination of pastel colors and cute bunny motifs, this nail art tutorial will guide you through the steps to create nails that are both festive and trendy. You don’t have to be a professional nail artist to master these techniques, as we’ll provide easy-to-follow instructions and tips for achieving flawless results.
Embrace your creativity and have fun experimenting with different colors, designs, and patterns. Whether you prefer a subtle bunny accent nail or a full bunny-themed manicure, incorporating these Easter Bunny Nails into your holiday look will surely make a statement.
From painting bunny silhouettes to adding tiny fluffy tails, we’ll teach you various techniques to bring these nail designs to life. Make your nails the highlight of your Easter celebration with our Easter Bunny Nails tutorial. Grab your favorite nail polish shades, nail art tools, and let’s get started on creating a festive and adorable manicure!
Questions and answers
What are some Easter nail art ideas I can try?
There are numerous Easter nail art ideas you can try! Some popular options include creating pastel-colored Easter eggs on your nails, painting bunnies or chicks, or even adding floral designs. You can also experiment with gradient colors, glitters, or nail stickers to add more flair.
How difficult is it to do Easter nail art at home?
Doing Easter nail art at home can vary in difficulty depending on the design you choose. Some designs, like simple polka dots or stripes, are relatively easy to do even for beginners. However, more intricate designs may require more practice and skill. It’s always helpful to start with simple designs and gradually work your way up to more complex ones.
What tools and materials do I need to create Easter nail art?
To create Easter nail art, you will need a few basic tools and materials. These include a base coat and top coat, a set of nail polish colors (preferably pastel shades), a nail art brush or dotting tool, toothpicks or a needle for detail work, nail stickers or decals (optional), and acetone or nail polish remover for cleanup.
Can I use regular nail polish for Easter nail art?
Absolutely! Regular nail polish works perfectly fine for Easter nail art. However, if you want more precise designs or intricate details, you might find it easier to work with nail art brushes and dotting tools. Gel polishes can also be used for Easter nail art as they offer a longer-lasting finish.
What are some easy Easter nail art ideas for beginners?
For beginners, some easy Easter nail art ideas are painting your nails in pastel colors like pink, blue, or yellow and adding simple designs like polka dots or stripes using a toothpick or a nail art brush. You can also try using nail wraps or stickers with Easter-themed designs such as bunnies, chicks, or Easter eggs.
How can I create a gradient effect on my Easter nails?
To create a gradient effect on your Easter nails, you can use a makeup sponge or a small piece of sponge to apply different shades of pastel nail polish onto your nails. Start with the lightest color at the base of your nails and gradually dab on the darker shades towards the tips. Gently blend the colors together using a clean sponge or a brush for a seamless gradient effect.
What materials do I need to create Easter nail art?
To create Easter nail art, you will need a few basic materials such as nail polish in various pastel shades, a clear top coat, a base coat, nail art brushes or toothpicks for designs, sponge for gradient effect, nail wraps or stickers with Easter designs, and nail polish remover for any mistakes or clean-ups.
Can you suggest some cute Easter-themed nail designs?
Sure! Some cute Easter-themed nail designs you can try are painting your nails as little Easter eggs with colorful patterns, creating bunny nails by painting your nails in white and adding bunny ears and a face, or even creating some floral designs like daisies or tulips. Don’t forget to add some glitter or rhinestones for some extra sparkle!
How long does Easter nail art usually last?
The longevity of Easter nail art depends on various factors such as the quality of the nail polish, the application technique, and your daily activities. Generally, if done properly with a good base coat and top coat, Easter nail art can last anywhere from a few days to a week. However, it’s always a good idea to touch up any chips or wear and tear to make it last longer.


