Are you ready to dive into the fascinating world of DIY slime? Let your imagination run wild as we guide you through a collection of innovative and easy-to-follow slime recipes. Whether you’re a beginner exploring the art of slime-making or a seasoned slime enthusiast looking to expand your repertoire, we’ve got you covered!
Discover the endless possibilities of homemade slime with our carefully curated selection of recipes. From glittery and scented slimes to fluffy and stretchy textures, there’s a slime recipe here to suit every taste and preference. Whether you’re looking to create a mesmerizing galaxy slime or a vibrant rainbow slime, the options are boundless. With just a few simple ingredients and a pinch of creativity, you’ll be amazed at what you can achieve!
Revolutionize Your Health & Lifestyle!
Dive into the world of Ketogenic Diet. Learn how to lose weight effectively while enjoying your meals. It's not just a diet; it's a lifestyle change.
Learn MoreUnleash your inner scientist and embark on a sensory adventure with these DIY slime recipes. Not only will you have a blast creating your own unique slimes, but you’ll also enhance your fine motor skills and explore the fascinating world of chemistry. Experiment with different colors, textures, and add-ins to create your own personal masterpiece. The process of making slime is not only entertaining but also educational, offering a hands-on experience in measuring, mixing, and observing chemical reactions.
- Experiment with Colorful Ingredients
- Create Stunning Slime with Vibrant Dyes
- Add a Pop of Sparkle with Glitter and Sequins
- Try Mixing Multiple Colors for Unique Patterns
- Explore Different Textures
- Add a Crunch with Foam Beads or Styrofoam Balls
- Create a Satisfying Gooiness with Jelly Cubes
- Make it Stretchy with Liquid Starch or Borax
- Add Exciting Scents
- Infuse Your Slime with Essential Oils for a Calming Aroma
- Experiment with Fruity Fragrances for a Sweet Scent
- Try Unique Scents like Bubblegum or Cotton Candy
- Questions and answers
Experiment with Colorful Ingredients
Let your creativity soar as you explore a world of vibrant possibilities with an array of colorful ingredients for your DIY slime creations. Dive into a rainbow of choices and embark on a journey of sensory exploration, where you can mix and match various hues to create mesmerizing slime that delights the eyes and engages the imagination.
Discover the joy of incorporating a kaleidoscope of colors by using different pigments, dyes, paints, and food coloring. Let the vibrant shades blend together to form unique and captivating slime that reflects your personal style. From deep and rich hues to soft and pastel tones, the options are limitless, and the results are truly stunning.
Don’t limit yourself to traditional colors – embrace the unconventional! Experiment with neon shades that glow under blacklight, metallic colors that shimmer and sparkle, or even color-changing pigments that create an enchanting effect. The world of color is at your fingertips, waiting for you to unleash your creative vision.
Explore the power of mixing and layering colors to achieve mesmerizing ombre effects or intriguing marbled patterns. Blend different shades together in a seamless gradient or create distinct color blocks for an eye-catching visual impact. Let your imagination run wild as you combine an endless palette of colors and witness the magic that unfolds.
Remember, each ingredient brings its own unique characteristics and properties to the mix. As you experiment with different colors, pay attention to the consistency and texture of your slime. Some pigments may make your slime more stretchy or sticky, while others may alter its overall feel. Embrace these variations as part of the creative process and embrace the unexpected.
So don’t be afraid to dive into a world of color and experiment with a riot of hues. With a vast array of colorful ingredients at your disposal, the only limit is your imagination. Let your inner artist shine as you create stunning DIY slime creations that are as unique and captivating as you are.
Create Stunning Slime with Vibrant Dyes
Enhance your slime-making experience by adding an explosion of colors with vibrant dyes. Taking your slime creations to the next level, vibrant dyes allow you to unleash your artistic flair and create stunning slime that captivates the eyes.
Injecting vitality into your slime, these dyes offer a vast range of hues to choose from, ranging from bold and daring to soft and subtle. With their intense pigmentation, vibrant dyes transform your plain slime into a mesmerizing work of art.
Whether you prefer a neon glow, a rainbow of colors, or a single standout shade, vibrant dyes offer endless possibilities for customization. Experiment with different combinations and layering techniques to achieve the desired visual effects.
For a more captivating visual experience, consider incorporating glitter, foam beads, or sequins into your slime along with vibrant dyes. These additions complement the colorful dyes and create a dynamic visual appeal that will leave everyone amazed.
Remember, the key to achieving stunning slime with vibrant dyes is to embrace your creativity. Let your imagination run wild and create unique slime creations that reflect your individual style and artistic vision.
Add a Pop of Sparkle with Glitter and Sequins
Elevate the shimmer and shine of your DIY slime by incorporating glitter and sequins into your creations. These dazzling additions will bring a whole new level of pizzazz and glamour to your slime projects. Sparkly glitters and sequins come in a variety of colors and sizes, allowing you to experiment and let your creativity run wild.
By adding glitters and sequins, you can create a mesmerizing playtime experience for kids and adults alike. The reflective properties of the sparkles will catch the light, providing a captivating visual effect that will leave everyone in awe.
- Choose fine glitters for a subtle and delicate sparkle.
- Opt for chunky glitters if you want a bold and eye-catching effect.
- Mix and match different colors of glitters and sequins for a multi-dimensional and vibrant slime.
- Create a galaxy-themed slime by using holographic glitters and star-shaped sequins.
- Experiment with iridescent glitters to add a magical and mystical touch to your slime.
Remember to add the glitters and sequins in moderation to avoid overwhelming your slime. Start with a small amount and gradually add more until you achieve the desired level of sparkle. Mix them gently into the slime base and enjoy the mesmerizing transformation.
Whether you’re creating slime for sensory play, stress relief, or just for the sheer joy of it, adding glitter and sequins can take your DIY slime to the next level. Let your imagination soar as you explore the endless possibilities of adding a pop of sparkle to your slime creations.
Try Mixing Multiple Colors for Unique Patterns

Immerse yourself in the wonderful world of slime by unleashing your creativity through the exploration of color mixing! By combining different hues together, you can create mesmerizing patterns that are truly one-of-a-kind.
When it comes to mixing colors, the possibilities are endless. Experiment with primary colors like red, blue, and yellow to create secondary colors such as purple, green, and orange. You can also mix different shades of the same color to add depth and variety to your slime.
To achieve unique patterns, try pouring two or more colors of slime together and gently swirling them around. The colors will blend and intertwine, creating beautiful marbled effects. You can also experiment with layering different colors on top of each other to create a striped or layered look.
Don’t be afraid to get creative and mix unconventional color combinations. Combine warm and cool tones for a striking contrast, or mix complementary colors for a harmonious blend. The key is to let your imagination guide you and have fun with the process!
Remember to document your color mixing experiments and share your creations with others. Whether you prefer vibrant rainbow patterns or subtle pastel hues, the possibilities for unique color combinations are endless. So grab your favorite colors, put on your creative hat, and get ready to make some truly mesmerizing slime!
Explore Different Textures
Immerse yourself in a world of sensory delight as you venture into the mesmerizing realm of DIY slime textures. This exciting section will guide you through an exploration of various tactile sensations and give you the tools to create your own unique textures. Let your hands and imagination take the lead as you dive into a world of squishiness, stretchiness, and more.
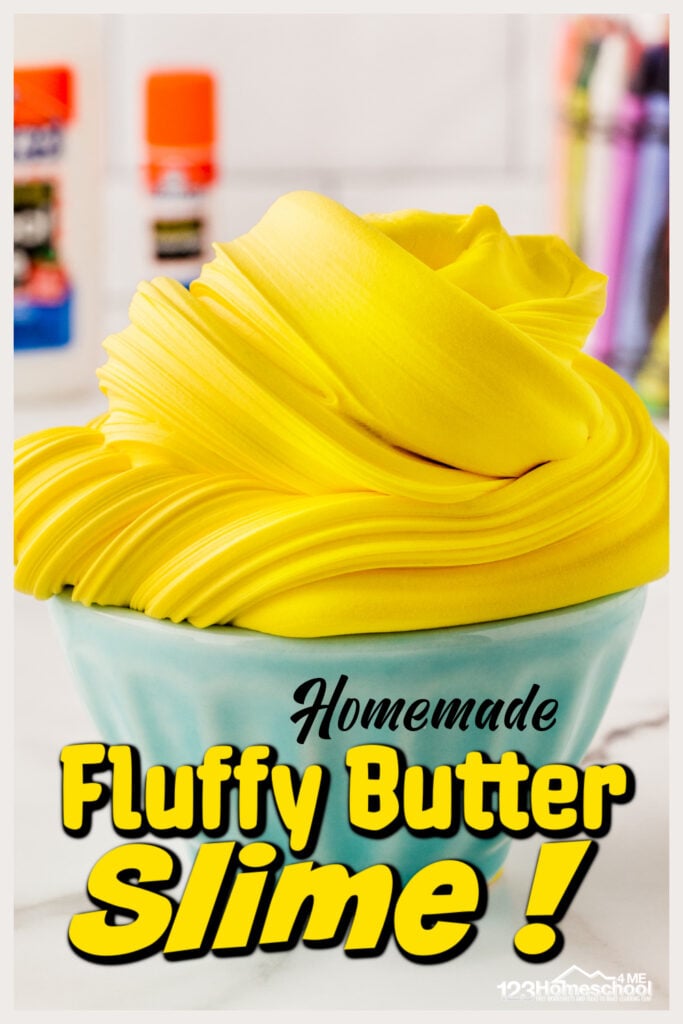
- Butter Slime: Experience the luxurious softness of butter slime as it glides through your fingers. This velvety texture is achieved by combining regular slime with clay or foam soap, creating a mesmerizing stretchiness that’s simply irresistible.
- Crunchy Slime: Discover the satisfying sound and texture of crunchy slime. By adding various add-ins like foam beads or cereal beads to your slime base, you’ll create a unique sensory experience that provides an audible and tactile delight.
- Cloud Slime: Get lost in the fluffiness of cloud slime, a light and airy texture created by combining slime with instant snow powder. The result is a fluffy, squishy slime that resembles a cloud and feels incredibly satisfying to touch.
- Floam Slime: Indulge in the delightful texture of floam slime, which combines foam beads with slime to create a crunchy and moldable sensory experience. The addition of foam beads adds a unique twist to regular slime, providing hours of tactile enjoyment.
- Glossy Slime: Dive into the glossy world of slime with this smooth and shiny texture. Add clear glue and borax to your slime mixture to achieve a glossy finish that is visually appealing and satisfying to touch.
Get ready to embark on a sensory adventure with these various slime textures. Experiment with different recipes and combinations to uncover textures that speak to your senses. The possibilities are endless, and your creativity is the only limit. So roll up your sleeves, gather your ingredients, and get ready to explore the exciting world of DIY slime textures!
Add a Crunch with Foam Beads or Styrofoam Balls

Enhance the sensory experience of your DIY slime by incorporating foam beads or styrofoam balls. These lightweight and versatile additions provide a satisfying crunch and texture that will take your slime to the next level.
By incorporating foam beads or styrofoam balls into your slime, you can create a unique and engaging tactile experience. These small balls add an element of surprise as you stretch and squish your slime, providing a satisfying crunch with every play. The texture of the foam beads or styrofoam balls adds an interesting tactile dimension, giving your slime a fun and interactive quality.
Experiment with different colors, sizes, and shapes of foam beads or styrofoam balls to add visual interest to your slime. You can mix different colors to create a vibrant and eye-catching design, or use larger balls for a more pronounced crunch. The possibilities are endless, allowing you to unleash your creativity and customize your slime to your liking.
When adding foam beads or styrofoam balls to your slime, be sure to start with a base slime recipe. You can then fold in the beads or balls gradually, ensuring even distribution throughout the slime. This will help create a consistent crunch and texture. Adjust the amount of beads or balls based on your preference, adding more for a stronger crunch or fewer for a subtler effect.
Remember to store your foam bead or styrofoam ball slime in an airtight container to maintain its freshness and prevent drying out. Regularly knead and stretch the slime to keep it pliable and enjoyable to play with.
Incorporating foam beads or styrofoam balls into your DIY slime allows you to add an exciting crunch and texture that will captivate your senses. Discover endless possibilities and let your imagination soar as you customize your slime with these fun and versatile additions.
Create a Satisfying Gooiness with Jelly Cubes
Indulge in a delightful sensory experience with the addition of jelly cubes to your homemade slime! Elevate the gooey goodness to a whole new level by incorporating these fascinatingly textured cubes.
Add a touch of excitement and intrigue to your slime creations by incorporating the captivating texture and vibrant colors of jelly cubes. These small, light cubes resemble tiny, wobbly blocks of jelly that transform your slime into a mesmerizing tactile experience.
Experiment with different combinations of slime recipes and jelly cube colors to create a tantalizing visual display. By adding a few drops of food coloring to your slime mix, you can create a kaleidoscope of vibrant hues that contrast beautifully with the translucent jelly cubes.
As you stretch, squeeze, and manipulate your slime, the jelly cubes provide an additional layer of satisfaction. The soft, squishy texture enhances the sensory experience, allowing you to feel the jelly cubes squelch and squish between your fingertips.
For an extra touch of creativity, consider incorporating scented oils into your slime recipe. The combination of enticing smells and the mesmerizing texture of jelly cubes will transport you to a world of olfactory delight and tactile satisfaction.
Inspire your imagination and explore the endless possibilities of jelly cubes in your DIY slime creations. Unleash your creativity as you customize your own unique slime recipes, incorporating these intriguing cubes and discovering the satisfying gooiness they bring to your creations. Prepare to be mesmerized and delighted by the sensory experience that awaits you!
Make it Stretchy with Liquid Starch or Borax
Enhance the elasticity and stretchiness of your homemade slime with the help of liquid starch or borax. These ingredients can give your slime a unique texture and allow it to stretch and pull without breaking.
When using liquid starch or borax, make sure to follow the instructions carefully to achieve the desired consistency. Start by adding a small amount of either ingredient to your slime mixture and gradually increase until you reach the desired stretchiness.
Liquid starch and borax act as binding agents in the slime, allowing the ingredients to stick together and form a cohesive and flexible texture. They also help to control the stickiness of the slime, making it easier to handle and play with.
Experiment with different ratios of liquid starch or borax to achieve different levels of stretchiness in your slime. You can also combine these ingredients with other additives, such as shaving cream or lotion, to create an even more unique texture.
Remember to always store your slime in an airtight container to keep it fresh and prevent it from drying out. With the addition of liquid starch or borax, your slime will stay stretchy and ready for countless hours of creative fun!
Add Exciting Scents
Enhance your DIY slime with captivating fragrances to create a multisensory experience. By incorporating delightful aromas, you can take your slime-making adventures to a whole new level. Elevate your sensory journey by exploring a wide range of scents that will awaken your imagination and transport you to different worlds.
Infuse your homemade slime with enticing scents that engage your sense of smell and complement its vibrant colors and textures. From soothing lavender and invigorating citrus to the nostalgic scent of freshly baked cookies, the possibilities are endless. Experiment with combinations and create unique aromas that will leave you and your friends pleasantly surprised.
While adding scents to your slime, remember to start with a small amount and gradually increase it until you achieve the desired aroma. You can use essential oils, fragrance oils, or even extract scents from natural ingredients like fruits or herbs. Be cautious and ensure that the scents you choose are safe to use in slime-making.
Not only will scents make your slime more enjoyable to play with, but they can also evoke memories, set the mood, or transport you to a specific place. The scent of a tropical beach may make you feel like you’re on vacation, while a fresh, clean aroma can create a sense of relaxation and serenity.
Unleash your creativity by incorporating scents that match your slime’s theme. For a galaxy-inspired slime, try adding a cosmic blend of lavender and eucalyptus. If you’re creating a mermaid-themed slime, opt for a mix of ocean breeze and coconut. The possibilities are limited only by your imagination.
Remember, scents are a powerful tool that can enhance the overall sensory experience of slime-making. So, explore, experiment, and let your imagination soar as you add exciting scents to your DIY slime creations.
Infuse Your Slime with Essential Oils for a Calming Aroma
Enhance the sensory experience of making and playing with slime by infusing it with the soothing scents of essential oils. Elevate your slime creations to a whole new level by incorporating fragrances that promote relaxation and help to create a calming atmosphere. Adding essential oils to slime not only enhances its scent but also contributes to a soothing and therapeutic experience.
By infusing your slime with essential oils, you can customize the aroma to suit your preferences. Experiment with a variety of oils such as lavender, chamomile, ylang-ylang, or eucalyptus to create a unique and relaxing scent. The gentle and pleasant fragrance of these oils can help ease stress, promote better sleep, and create a calming ambiance.
When adding essential oils to your slime, remember that a little goes a long way. Start by adding a few drops and gently knead the slime to distribute the scent evenly. You can always add more if you prefer a stronger aroma, but be cautious not to overpower the scent. The oils will also provide your slime with a subtle shine, enhancing its visual appeal.
It’s important to note that some essential oils may cause skin irritation or allergic reactions in certain individuals. Therefore, it’s recommended to perform a patch test on a small area of skin before incorporating them into your slime recipe. Additionally, ensure that the essential oils you choose are of high quality and suitable for use. Look for pure and therapeutic-grade oils to ensure both safety and effectiveness.
Unleash your creativity and imagination by infusing your slime with essential oils. Transform the sensory experience and make your slime activities even more enjoyable and calming. Experiment with different scents to find the perfect aroma that brings you relaxation and tranquility. Soothe your senses and indulge in the therapeutic benefits of essential oils while having fun with your homemade slime creations.
Experiment with Fruity Fragrances for a Sweet Scent
Explore the aromatic world of fruity fragrances and enhance your DIY slime experience with a delightful and refreshing twist. Adding scents to your slime not only creates a pleasant scent but also stimulates your senses and adds an extra layer of fun. In this section, we will guide you through different fruity fragrances to experiment with, allowing you to infuse your slime creations with a sweet and captivating aroma.
To get started, consider incorporating citrusy scents like lemon, orange, or grapefruit. These zesty aromas can bring a burst of freshness and invigoration to your slime. Another popular fruity fragrance option is tropical fruits such as pineapple, mango, or coconut, which can transport you to a tropical paradise with each whiff. If you prefer a sweeter scent, try adding hints of strawberry, watermelon, or cherry to your slime for a mouthwatering aroma.
Once you have chosen your desired fruity fragrance, it’s time to unleash your creativity and experiment with different combinations. Mix and match scents to create your unique blend that suits your taste and preferences. You can create a refreshing citrus cocktail by combining lemon and orange fragrances or a tropical delight by mixing pineapple and coconut. The possibilities are endless, allowing you to create a personalized scent that reflects your imagination.
| Fruity Fragrance | Description |
|---|---|
| Lemon | A vibrant and tangy aroma that adds a refreshing touch to your slime. |
| Orange | A citrusy scent that brings a burst of energy and vibrancy to your slime creations. |
| Grapefruit | A zesty and invigorating fragrance that awakens your senses and adds a unique twist to your slime. |
| Pineapple | A tropical aroma that evokes images of sunny beaches and fruity cocktails. |
| Mango | A luscious scent that transports you to a tropical paradise with its sweet and juicy notes. |
| Coconut | A creamy and tropical fragrance that adds a hint of exoticism to your slime. |
| Strawberry | A sweet and irresistible aroma that evokes memories of fresh strawberries. |
| Watermelon | A juicy and refreshing scent that brings a summery vibe to your slime. |
| Cherry | A mouthwatering fragrance that adds a burst of sweetness to your slime creations. |
Remember to use fragrance oils specifically designed for crafts, as they are safe to use and provide a long-lasting scent. Start with a few drops of your chosen fragrance, gradually adding more until you achieve your desired intensity. Don’t be afraid to experiment and mix different scents together to create a truly unique and captivating aroma that will make your slime experience even more enjoyable.
With fruity fragrances, you can take your DIY slime creations to the next level, tantalizing your senses and indulging in a sweet and aromatic adventure. So, let your imagination run wild and get ready to create scented slimes that will capture the hearts and noses of everyone who encounters them!
Try Unique Scents like Bubblegum or Cotton Candy
Explore an array of captivating aromas and elevate your slime-making experience by incorporating delightful scents like bubblegum or cotton candy. Infusing your DIY slime with unique fragrances adds an exciting sensory element that will make your creations even more enjoyable.
The possibilities are endless when it comes to choosing scents for your slime. Instead of sticking to traditional options, such as fruit or floral scents, think outside the box and experiment with playful aromas like bubblegum or cotton candy. These unconventional scents will transport you to a world of sweet memories and childhood nostalgia.
To incorporate these scents into your slime, you can use scented oils or extracts specifically designed for crafting. Mix a few drops of bubblegum-scented oil into your slime mixture and knead it well to distribute the scent evenly. The result will be a mesmerizing blend of stretchy slime with a delightful bubblegum fragrance.
If you prefer the aroma of cotton candy, add a few drops of cotton candy extract to your slime mixture and mix it thoroughly. The result will be a fluffy and scented slime that will remind you of amusement park visits and lazy summer days.
Don’t be afraid to mix and match scents to create your custom concoctions. Combine bubblegum and cotton candy for a whimsical aroma that will delight your senses. You can also experiment with other unique scents, such as marshmallow, cola, or even freshly baked cookies, to create a wide range of scented slimes.
| Advantages | Disadvantages |
|---|---|
| Increase sensory experience | Some scents may be overpowering |
| Adds an extra layer of fun to your creations | May require experimentation to find the desired scent intensity |
| Allows for personalization and creativity | Some scented oils or extracts may be difficult to find |
Remember, the key to successful experimentation with scented slimes is to start with small amounts of fragrance and gradually adjust it to your liking. This way, you can create one-of-a-kind slime that not only looks amazing but also smells absolutely irresistible!
Questions and answers
What are some easy DIY slime recipes to try?
Some easy DIY slime recipes to try include basic slime, glitter slime, fluffy slime, clear slime, and butter slime. Each recipe involves different ingredients and steps, but they are all relatively simple to make.
Can I customize the color of slime?
Yes, you can customize the color of slime by adding food coloring or liquid watercolors. Simply mix in a few drops of the desired color until you achieve the shade you want. You can also mix different colors together to create unique shades.
Are these slime recipes safe for kids to play with?
These slime recipes are generally safe for kids to play with, but adult supervision is recommended, especially when working with younger children. It is important to use non-toxic ingredients and follow the instructions carefully to ensure the slime is safe to handle and play with.
Can I add different textures or add-ins to the slime?
Absolutely! You can add various textures and add-ins to the slime to make it more interesting. Some popular options include foam beads, glitter, sequins, confetti, or even small toys. Experiment with different combinations to create the texture and look you desire.
What are some storage tips for keeping slime fresh?
To keep slime fresh and reusable, store it in an airtight container or a ziplock bag. Make sure to remove any air bubbles before sealing the container. Also, avoid exposing the slime to extreme temperatures or direct sunlight, as it can affect its consistency and longevity.
What materials do I need to make slime?
To make slime, you will need a few basic materials such as glue, water, borax or liquid starch, and food coloring (optional). You can also add different add-ins like glitter or beads to make your slime unique.
Can I make slime without using borax?
Yes, if you don’t have borax or prefer not to use it, you can make slime using alternatives such as liquid starch or contact lens solution. These alternatives work just as well in creating the desired slime consistency.
Are these DIY slime recipes safe for children?
Yes, these DIY slime recipes are generally safe for children to make and play with. However, it is important to closely supervise young children during the process to ensure they do not ingest any of the ingredients and to avoid any potential allergic reactions. Always check the safety guidelines and consult with an adult when necessary.
How long does it take to make slime?
The time it takes to make slime can vary depending on the recipe and your experience. On average, it takes about 10-15 minutes to make slime from start to finish. Once you have mixed the ingredients, you may need to knead and manipulate the slime for a few more minutes to achieve the desired consistency.
What can I do if my slime turns out too sticky or too hard?
If your slime is too sticky, you can add a small amount of borax or liquid starch and continue kneading until it reaches the desired texture. On the other hand, if your slime is too hard, adding a few drops of water or lotion can help soften it. Adjusting the ingredients gradually will help you achieve the perfect consistency.