
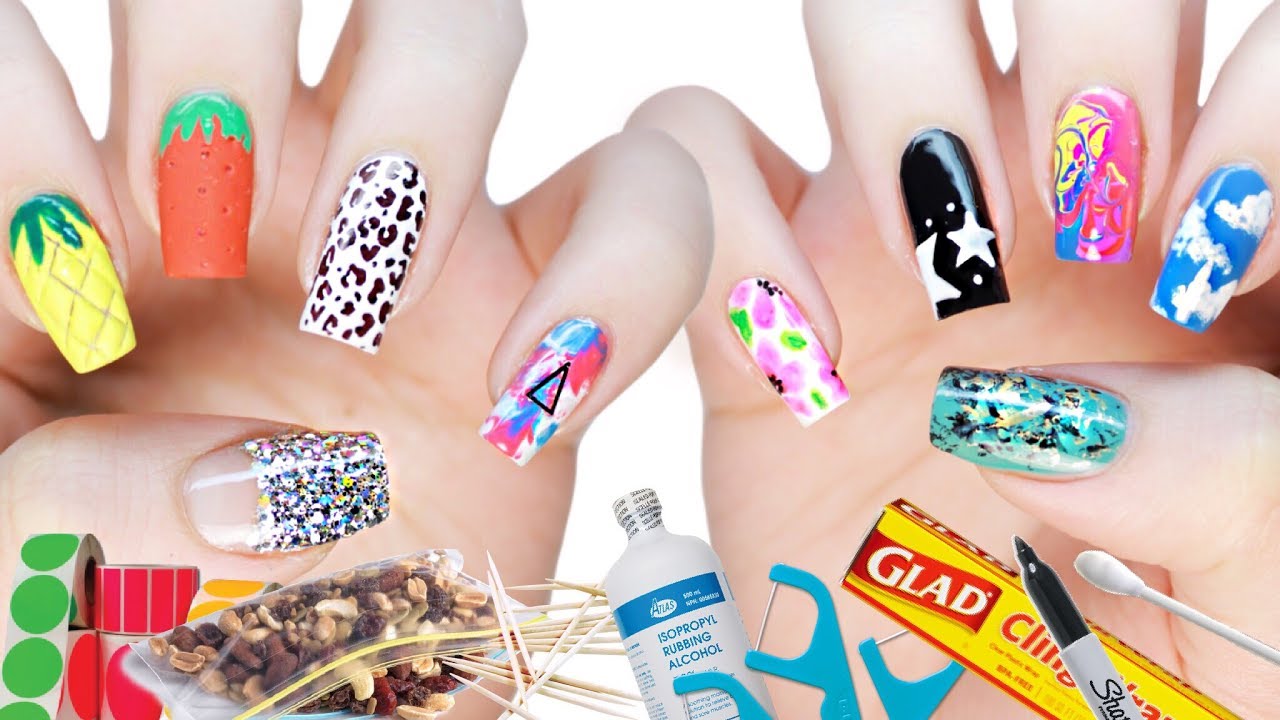
Are you ready to embark on a journey of self-expression and creativity? Look no further! In this article, we will explore a collection of inspiring and effortless nail art ideas that you can easily recreate at the comfort of your own home. Let your imagination run wild as you dive into the world of DIY nail designs that are sure to leave everyone impressed.
Unleash the artist within you and make a statement with your nails. With just a few simple tools and a touch of inspiration, you can transform your nails into miniature works of art. Whether you prefer bold and vibrant patterns or delicate and intricate designs, there’s something for everyone to explore. From floral motifs to geometric shapes, the possibilities are endless.
Get ready to experiment with different techniques and make your nails stand out from the crowd. From ombre gradients to glitter accents, each design has its own unique charm that will add a touch of glamour to your summer look. Find the perfect balance between elegance and playfulness and let your nails become a canvas for your imagination.
Don’t worry if you’re new to nail art – these ideas are designed for all skill levels. From beginners to experienced nail artists, everyone can find something to inspire them. So grab your favorite nail polishes and get ready to unleash your inner artist. Get ready to make a statement, because your nails are about to become the ultimate accessory that reflects your personality and style.
- Get Inspired by These Effortless Summer Nail Art Concepts at Your Own Space
- Explore Exciting Summer Nail Art Ideas
- Vibrant Tropical Patterns
- Create a Tropical Paradise on Your Nails
- Easy Step-by-Step Tutorial for Tropical Nail Designs
- Fun and Playful Fruit Nail Art
- Add a Burst of Color with Fruit Nail Decorations
- Simple DIY Tutorial for Fruit-inspired Nail Art
- Questions and answers
Get Inspired by These Effortless Summer Nail Art Concepts at Your Own Space
Unleash your imagination and transform your nails into stunning works of art this summer with these easy-to-follow DIY nail design ideas. Whether you’re seeking a vibrant and colorful look or a more subtle and delicate style, there’s something here that will surely suit your taste.
1. Expressive Accents: Add an extra touch of personality to your nails with expressive accents. Think beyond basic colors and experiment with textures, patterns, and shapes to create a unique and eye-catching design. Whether it’s tiny hearts, glitter flakes, or geometric lines, these accents will elevate your nail game.
2. Nature-inspired Beauties: Embrace the beauty of nature by incorporating floral or leafy motifs into your nail art. Use delicate brush strokes to create intricate flowers or opt for a minimalist design by highlighting a single elegant leaf. Nature-inspired nail art is perfect for capturing the essence of summer and adding a touch of freshness to your look.
3. Playful Pastels: There’s something unquestionably charming about pastel shades. Experiment with soft hues like baby blue, mint green, or lavender to achieve a whimsical and dreamy look. Combine pastel colors with geometric shapes or delicate patterns to create a nail art design that’s both playful and sophisticated.
4. Bold and Vibrant: If you’re in the mood for some summer energy, go for bold and vibrant nail art designs. Choose bright and daring colors like electric yellow, hot pink, or fiery orange to make a statement. Add contrasting shades or geometric shapes for a modern twist, and you’ll have nails that command attention wherever you go.
5. Dainty and Elegant: Sometimes, less is more. For an elegant and refined look, embrace minimalism. Opt for soft nude shades or sheer pastels that effortlessly bring out the natural beauty of your nails. Add a touch of sophistication by incorporating delicate lines or accents, and you’ll achieve a timeless and graceful nail art design.
With these DIY summer nail art ideas, you’ll be able to express your unique style and embrace the spirit of the season from the comfort of your own home. Have fun experimenting with various designs and remember to let your creativity shine!
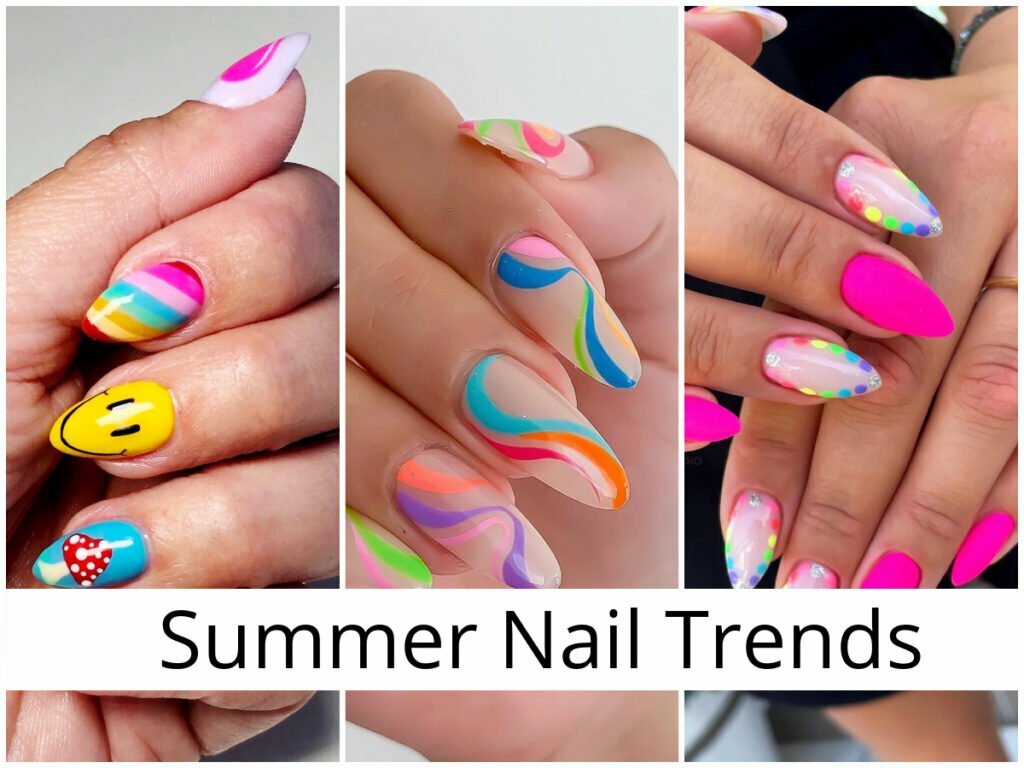
Explore Exciting Summer Nail Art Ideas
Discover a world of limitless creativity and inspiration with these stunning nail art ideas for the vibrant summer season. Dive into a spectrum of colors, patterns, and designs to express your unique style and embrace the summer vibes. Transform your nails into miniature canvases and let your imagination run wild as you explore the endless possibilities of summer-inspired nail art.
Unleash your artistic side using various techniques and tools to achieve a myriad of eye-catching looks. Experiment with ombre gradients that evoke the mesmerizing hues of a summer sunset, or opt for playful polka dots that mimic the look of colorful beach umbrellas. Alternatively, embrace the beauty of nature with delicate floral motifs or channel the refreshing vibe of tropical destinations with palm tree silhouettes.
Create a nail art statement by incorporating sparkling rhinestones, glitter, or metallic accents that instantly elevate your summer manicure. Whether you prefer a subtle touch of shimmer or a dazzling display of bling, these embellishments add a touch of glamour and sophistication to your nails, perfect for special occasions or simply brightening up a casual summer day.
Take inspiration from the latest fashion trends and incorporate them into your summer nail art. From bold geometric shapes and abstract designs to vibrant tie-dye patterns, the options are endless. Experiment with negative space nails, where portions of the natural nail are intentionally left bare to create unique and artistic designs that are sure to turn heads.
Don’t be afraid to mix and match different styles, colors, and textures to create your signature summer nail art look. With a little creativity and practice, you can transform your nails into a mesmerizing display of summer beauty that complements your personal style and adds a touch of fun and joy to your everyday life.
So, venture into the world of exciting summer nail art ideas and let your imagination soar as you embark on a journey of self-expression and creativity. From subtle and classy to bold and daring, there’s a summer nail art idea to suit every taste and occasion. Embrace the season’s vibrant energy and showcase your personality through your stunningly adorned fingertips.
Vibrant Tropical Patterns
Immerse yourself in a world of vibrant tropical patterns that will transport you to a tropical paradise right at your fingertips. Explore the beauty of nature through these stunning nail art designs inspired by the lush and exotic flora and fauna found in tropical destinations. This section will guide you through the process of creating eye-catching tropical patterns that are sure to make a statement this summer.
Embrace the boldness of tropical colors with vibrant shades like lush greens, electric blues, and sunny yellows. Combine these hues with intricate patterns such as palm leaves, colorful flowers, and exotic animal prints, and watch your nails come to life with a burst of tropical energy. Incorporate techniques like ombre gradients and abstract brush strokes to add depth and dimension to your designs.
Be inspired by the diversity of tropical flora and fauna as you experiment with different patterns and motifs. Use an emerald green as the base for a tropical leaf design and add pops of color with vibrant flower accents. Alternatively, create an abstract pattern with shades of aqua, turquoise, and navy inspired by the mesmerizing colors of tropical waters. The possibilities are endless when it comes to tropical patterns, so don’t be afraid to let your creativity shine.
To achieve these vibrant tropical patterns at home, you’ll need a selection of tropical-inspired nail polishes, nail art brushes, and dotting tools. Start by applying a base coat to protect your nails, then use a thin brush or a dotting tool to carefully create your desired tropical pattern. Experiment with different techniques and colors to create a unique and personalized design that reflects your own tropical paradise.
Whether you’re heading to the beach or simply want to add a touch of summer to your everyday look, tropical patterns are the perfect choice for your nails. Embrace the vibrant colors and intricate details of the tropics and let your nails express the essence of summer all year round.
Create a Tropical Paradise on Your Nails
Transport yourself to a dreamy getaway as you dive into the world of nail art. Explore the vibrant and exotic wonders of a tropical paradise right at your fingertips. With these artistic ideas and simple techniques, you can transform your nails into mini works of art that evoke the beauty and serenity of a tropical oasis.
Embrace the lushness of nature with palm tree designs. Adorn your nails with delicate palm fronds swaying in the breeze, or go for a unique twist with an abstract interpretation of these iconic trees. Use a combination of green shades and added accents, such as glitter or rhinestones, to bring your tropical nail art to life.
Bring the ocean to your fingertips with stunning seashell motifs. Experiment with pastel hues reminiscent of tranquil beaches, or opt for a bold statement with vibrant colors mirroring the tropical sea. Accentuate your seashell designs with metallic foils or 3D embellishments for an extra touch of luxury and dimension.
Indulge in the vibrant colors of a tropical sunset with gradient nail art. Create a mesmerizing display that transitions from warm oranges and pinks to deep purples and blues. Play with different techniques, such as sponging or brush strokes, to achieve the perfect sunset effect. Finish off with a layer of shimmer or a sprinkle of glitter to capture the ethereal beauty of a tropical twilight.
Don’t forget the exotic flora and fauna that thrive in a tropical paradise. Consider intricate floral designs, featuring hibiscus or plumeria flowers, to add a touch of elegance and femininity to your nails. Experiment with bold color combinations and intricate detailing to make these floral designs truly stand out.
Whether you’re planning a vacation or simply want to channel the spirit of a tropical paradise, these nail art ideas will transport you to a world of sun, sand, and relaxation. So go ahead, unleash your creativity, and create your very own tropical oasis on your nails.
Easy Step-by-Step Tutorial for Tropical Nail Designs
Discover how to create stunning tropical nail designs in a few simple steps. In this tutorial, we will guide you through the process of achieving vibrant and eye-catching nail art inspired by the lush beauty of the tropics.
Step 1: Preparing your nails
Begin by gently shaping your nails with a file to achieve your desired nail shape. Remember to also remove any existing nail polish using an acetone-free nail polish remover.
Step 2: Applying a base coat
Apply a thin layer of base coat to each nail, ensuring full coverage. This will create a smooth surface for the nail polish to adhere to, as well as protect your natural nails from staining.
Step 3: Choosing your tropical colors
Select a range of vibrant and tropical nail polish colors. Think of lush greens, vibrant blues, sunny yellows, and exotic pinks. These colors will help bring the tropical theme to life on your nails.
Step 4: Creating a gradient effect
Start with the lightest color from your chosen palette and apply it to the base of your nail. Then, take a sponge and dab it onto the nail, gradually blending it upwards towards the tip. Repeat this process with each subsequent color to create a beautiful gradient effect.
Step 5: Adding tropical elements
Now it’s time to add some tropical elements to your nails. Using a thin brush or a nail art pen, create patterns such as palm leaves, hibiscus flowers, or even a tropical sunset. Let your imagination run wild and experiment with different designs.
Step 6: Sealing the design
To make your tropical nail art last longer, apply a generous layer of top coat over each nail. This will seal and protect the design, as well as add a glossy finish.
With these easy step-by-step instructions, you can achieve stunning tropical nail designs that will transport you to a tropical paradise every time you look at your nails. So grab your nail polish and get ready to create a little piece of the tropics right at home!
Fun and Playful Fruit Nail Art
Embrace a delightful and imaginative nail art trend by adorning your nails with vibrant and playful fruit designs. Allow your creativity to run wild as you experiment with juicy citrus slices, succulent berries, and tropical fruits.
Let your nails become a canvas for showcasing the delicious colors and textures of various fruits. Whether you opt for a bold and eye-catching watermelon pattern or a more subtle and elegant strawberry design, fruit nail art is a fantastic way to add a touch of summery fun to your look.
By incorporating fruit-inspired elements like slices, seeds, and leaves onto your nails, you can create stunning and unique nail designs that capture the essence of a tropical paradise. Use bright and cheerful shades to mimic the vibrant hues of your favorite fruits, or opt for a more minimalist approach with delicate fruit accents.
For a more playful look, consider adding cute faces or emoji-inspired designs to your fruit nail art. Turn a simple orange slice into a friendly character or transform a banana into a smiling emoji. This extra touch of whimsy will make your nails stand out and bring a smile to everyone’s face.
There are endless possibilities when it comes to fruit nail art. Whether you’re attending a summer party or simply want to brighten up your day, these fruity designs are sure to add a burst of color and cheer to your manicure. So grab your favorite nail polish shades, gather some inspiration from your favorite fruits, and let your creativity flourish!
Add a Burst of Color with Fruit Nail Decorations
When it comes to summer nail art, why settle for ordinary when you can add a vibrant touch to your manicure with fruity decorations? Spice up your nail game with these refreshing and playful designs that are sure to make a statement.
|
1. Citrus Delight Embrace the citrusy goodness by painting your nails in vibrant shades of orange and yellow. Then, add a pop of color with cute lemon and orange slice decals for an extra burst of freshness. |
2. Tropical Vibes Transport yourself to a tropical paradise by adorning your nails with tropical fruit designs. From pineapples to watermelons to kiwis, let your imagination run wild and create a vibrant mosaic of fruity goodness. |
|
3. Berrylicious Fun If you’re a fan of berries, this nail art idea is perfect for you. Paint your nails in delightful shades of pink and purple, then add tiny strawberry, raspberry, and blueberry decals for a sweet and charming look. |
4. Exotic Paradise Channel the exotic vibes of a tropical paradise with nail designs inspired by exotic fruits like mangoes, papayas, and dragon fruits. These bold and vibrant colors will make your nails stand out from the crowd. |
|
5. Juicy Watermelon Cool down in the summer heat with watermelon-inspired nails. Paint your nails in refreshing shades of green and pink, then add black seeds for the perfect watermelon slice look. This design is sure to quench your thirst for creativity. |
6. Tropical Sunset Capture the mesmerizing colors of a tropical sunset on your nails. Paint your nails in sunset-inspired shades of orange, pink, and purple, then add palm tree or coconut decals for a tropical vacation vibe. |
By incorporating these fruit nail decorations into your summer manicure, you can add a fun and colorful twist to your style. From citrus to tropical fruits, choose the design that speaks to you and let your nails become a canvas for creativity.
Simple DIY Tutorial for Fruit-inspired Nail Art
In this section, we will explore an easy and fun DIY tutorial that will help you achieve fruit-inspired nail art designs. These designs will add a playful and vibrant touch to your summer look, allowing you to express your creativity and showcase your love for all things fruity.
To begin, gather the necessary materials for this tutorial. You will need a base coat, various nail polish colors representing different fruits, a fine-tipped nail brush or toothpick, a top coat, and nail art decals or stickers featuring fruit designs.
Start by applying a base coat to protect your nails and create a smooth canvas for your fruit-inspired designs. Once the base coat has dried, choose a color that corresponds to the fruit you want to portray on your nails. For example, use yellow polish for a lemon or green polish for a lime.
Using the fine-tipped nail brush or toothpick, gently create the shape of the fruit on your nails. You can create a round shape for citrus fruits or a curved shape for berries. Experiment with different sizes and positions to add variety to your nail art.
After you have painted the fruit shape, allow it to dry completely before adding any additional details. Once dry, use the same technique to add small seeds or dots to represent the texture of the fruit. You can use a contrasting color or even use a toothpick dipped in black nail polish for precise dotting.
If you prefer an easier option, you can also use nail art decals or stickers featuring various fruit designs. Simply apply the decal or sticker to your nail following the instructions on the packaging and seal it with a top coat for a longer-lasting design.
Once you have finished adding all the fruit-inspired designs to your nails, allow them to dry completely before applying a final layer of top coat. This will seal in your designs and add a glossy finish to your manicure.
Now you are ready to show off your fruit-inspired nail art and enjoy the summery vibes it brings. Whether you opt for hand-painted fruit designs or convenient nail decals, these simple DIY techniques will surely make your nails stand out and add a touch of fruity fun to your overall look.
Questions and answers
What are some easy DIY summer nail art ideas?
There are several easy DIY summer nail art ideas you can try at home. One idea is to create a gradient effect using different shades of the same color. Another idea is to use a toothpick to create small polka dots on your nails. You can also try painting simple palm trees or tropical fruits for a summer theme. Lastly, you can experiment with different nail art stickers and decals to create unique designs.
Can you give some tips for beginners who want to try DIY nail art?
Absolutely! If you’re new to DIY nail art, start with simple designs and gradually work your way up. Practice on fake nails first to get the hang of it. Invest in quality nail polish and tools such as brushes, dotting tools, and tape. Don’t rush the process and take your time to ensure a neat and precise application. Lastly, don’t forget to use top coat to seal and protect your nail art.
How long does DIY nail art last?
The longevity of DIY nail art depends on various factors such as the quality of the nail polish, the application technique, and how well you take care of your nails. On average, DIY nail art can last anywhere from a few days to a week. Applying a top coat and avoiding activities that can cause chipping or peeling, such as excessive hand washing or using harsh chemicals without gloves, can help prolong the lifespan of your nail art.
Where can I find inspiration for summer nail art designs?
You can find inspiration for summer nail art designs from various sources. One option is to search for ideas on social media platforms like Instagram or Pinterest. You can follow nail artists or hashtags related to nail art for an endless supply of inspiration. Another option is to look for inspiration in nature, such as vibrant flowers, tropical landscapes, or beach scenery. Fashion magazines and beauty blogs can also offer inspiration for trendy and fashionable nail art designs.
Can I remove DIY nail art easily at home?
Yes, you can remove DIY nail art easily at home. The most common method is to soak your nails in a bowl of acetone for about 10-15 minutes. Afterward, use a cuticle pusher or an orange stick to gently lift off the nail art. If there are any stubborn areas, you can use a nail file or buffer to lightly buff off the remaining polish. It is important to moisturize and nourish your nails after removing nail art to prevent dryness or damage.
What are some simple DIY summer nail art ideas that I can try at home?
There are several easy DIY summer nail art ideas that you can try at home. One idea is to create a beach-inspired nail design using shades of blue and white. You can also try a watermelon design by painting your nails green and adding small black seeds. Another fun idea is to create a colorful rainbow design by painting each nail a different color. Don’t forget to try a fruity design by painting your nails various fruit-inspired colors like orange, pink, and yellow.
How can I make a beach-inspired nail design?
To create a beach-inspired nail design, start by painting your nails with a light blue polish as a base. Then, take a white polish and create wavy lines or swirls on top of the blue. You can also add small white dots to represent seafoam. For an added touch, you can use a toothpick or a nail art brush to draw palm trees or seashells on one or two accent nails.
What colors can I use for a watermelon nail design?
To achieve a watermelon nail design, you will need green and red nail polish. Paint your nails green first and allow them to dry completely. Once dry, take a bright red polish and paint the tips of your nails to create the watermelon fruit. To complete the design, use a black nail art pen or a toothpick to add small black seeds onto the red portion.
Can you suggest a simple rainbow nail design?
A simple rainbow nail design can be achieved by painting each nail a different color. Start with a white base coat to make the colors pop. Then, choose a set of bright colors like red, orange, yellow, green, blue, and purple. Paint each nail a different color, creating a gradient effect from one end to the other. Once dry, you can also add a layer of glitter polish on top for some extra sparkle.
What are some fruit-inspired colors that I can use for a fruity nail design?
For a fruity nail design, you can use colors that represent different fruits. Some fruit-inspired colors include orange for oranges, pink for watermelons, yellow for lemons, and green for limes. You can paint each nail a different fruit-inspired color or create a design with multiple fruits on each nail. You can also add small details like seeds or slices using a toothpick or nail art brush.


